A tightness test is the single most important check you carry out before letting gas into a system. It proves that the pipework holds pressure — that gas is going to the appliances and nowhere else. Get it wrong and you can leave a leak behind a wall. This guide explains the why behind each step, then walks the full procedure as it now stands under the 2026 standard. It's written for study and assessment preparation — only a Gas Safe registered engineer may legally work on a real gas installation.
What the test actually proves
"Tightness testing" is really two checks done back to back, and it helps to keep them separate in your head because they answer different questions.
The let-by test asks: is the valve I'm relying on to hold the gas back actually holding it back? Before you can trust a pressure reading on the installation, you have to know that the emergency control valve (ECV) — the consumer's main on/off valve — isn't quietly passing ("letting by") gas into the section you're testing. If it leaks through, gas would seep in during the test and mask a real leak by holding the pressure up. The only acceptable result for a let-by test is no rise in pressure.
The tightness test then asks the real question: once the section is sealed and settled, does it hold pressure? You watch a gauge over a timed period and compare any drop against the permissible figure for that installation.
The standard and the instrument
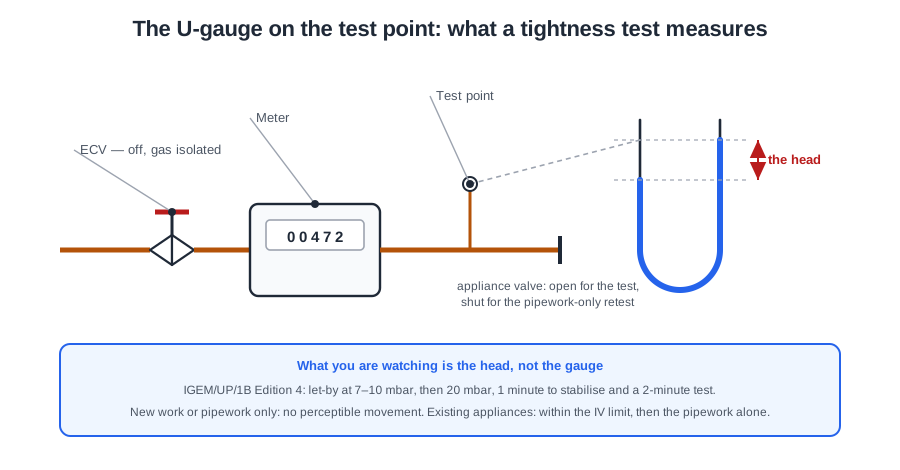
For domestic-sized natural gas (and LPG) work, the governing document is IGEM/UP/1B — published by the Institution of Gas Engineers and Managers. It applies to small installations: a meter badged at no more than 16 m³/h, pipework up to 35 mm, and an Installation Volume (IV) of no more than 0.035 m³ (which covers virtually every house). Larger installations fall under IGEM/UP/1A, and larger or higher-pressure ones again under IGEM/UP/1.
You measure pressure with a manometer — either a water-filled "U-gauge" or an electronic gauge. It must be in calibration (electronic gauges are typically certified every 12 months). A manometer measures pressure, not combustion — judging the flame or flue gases is a separate job for an analyser.
Why Edition 4 changed the pass mark
Under the old edition, the allowable pressure drop was pegged to the meter's badged capacity (the well-worn "U6" figures). The problem is that the meter tells you nothing about how much gas is actually sitting in the system you're testing. Picture the same tiny leak on two systems — a tiny flat and a big house. The big house holds far more gas, so that leak makes up a smaller proportion of the total and shows a smaller drop on the gauge. Same fault, different reading. That's a safety gap.
Edition 4 closes it by scaling the permissible drop to the actual Installation Volume — the real volume of gas in the pipework and meter under test. It runs opposite to most people’s instinct: a smaller Installation Volume allows a larger drop. The limits come from a fixed permitted leakage rate, and the same small leak moves the gauge much further in a small system than in a big one. You calculate the IV (from pipe diameters, lengths and meter type), then read the permissible drop from the Edition 4 table for that IV band.
| Installation Volume (IV) | Maximum permissible drop |
|---|---|
| ≤0.005 m³ | 8 mbar |
| >0.005 – ≤0.010 m³ | 4 mbar |
| >0.010 – ≤0.015 m³ | 2.5 mbar |
| >0.015 – ≤0.035 m³ | 1 mbar |
LPG and LPG/air have their own tables with tighter figures — and for LPG above 0.01 m³ the entry is simply no perceptible movement, with no drop allowed at all.
The procedure, step by step
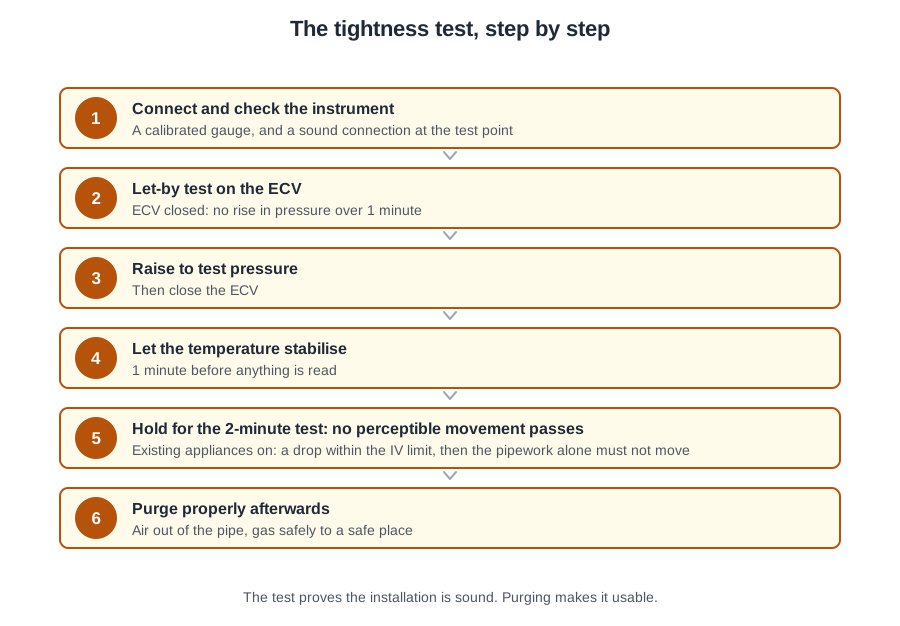
Here is the sequence for a domestic natural gas installation. Treat it as a learning walkthrough, not a substitute for supervised training.
- Prepare and connect. Make sure appliances are connected (or capped if not), turn off appliance taps as the procedure requires, and fit your gauge at a suitable test point with the ECV closed.
- Let-by test. Open the ECV slowly to raise the pressure to 7–10 mbar, close it, and watch the gauge for 1 minute. Any rise means the ECV is letting by — stop and investigate; you cannot test through a passing valve.
- Raise to test pressure. Open the ECV briefly to bring the installation up to test pressure (for natural gas, 20 mbar, or a minimum of 18 mbar if 20 cannot be reached, just below the normal operating pressure), then close it again.
- Stabilisation period. Allow 1 minute, re-adjusting the pressure if it has drifted, before timing the test. Gas warms or cools slightly as it's compressed and as it sits in the pipe; letting it settle stops temperature change being mistaken for a leak.
- Tightness test (2 minutes). Time the test period and read the drop. With existing appliances connected and no smell of gas, compare any drop with the permissible drop for your calculated IV. Pipework only, or only new appliances connected, must show no perceptible movement. A smell of gas is a fail whatever the gauge shows.
- Pipework-only retest. This is the new Edition 4 step. If a drop was seen but it's within the permissible limit with appliances connected, you must isolate the appliances and retest the pipework only. The pipework itself must show no perceptible movement — any perceptible movement here is an automatic fail. This separates harmless settling inside appliance valves from a genuine pipework leak. Where it is not reasonably practicable to isolate the appliances, the test is carried out with them connected and any perceptible movement is a fail.
If it fails: finding the leak
A fail means a leak, and a leak means the installation must not be left in use — that is a safety decision, not a paperwork one. Trace it with leak detection fluid (LDF) — an approved bubble solution brushed onto joints — never a naked flame. Once repaired, the whole test is repeated from the start. If you cannot find and fix the leak, turn the supply off at the ECV, leave it off and handle it under the unsafe-situations procedure (GIUSP / IGEM/G/11).
Purging — and why you can't skip it
Purging means displacing the air in new pipework with gas (or, when decommissioning, displacing the gas with air). The reason is the flammable range: a mixture of gas and air will ignite only between its lower and upper explosive limits (roughly 5%–15% gas in air for natural gas). If you let gas trickle into an air-filled pipe, it must pass through that explosive band on the way. Purging moves the system through that danger zone quickly and deliberately, venting to a safe place, so you don't leave an ignitable air/gas mixture sitting in the pipework.
Edition 4 also tidied up the maths. The purge volume is now simply:
PV = 1.5 × IV — one and a half times the Installation Volume, regardless of meter size or pipe diameter.
You confirm the purge is complete using a gas detector at the vent (or the long-standing smell test where appropriate), making sure no pockets of air remain.
One note on medium-pressure meters
Most homes run at low pressure, but some have a medium-pressure supply with a regulator (above about 75 mbar). These have their own tightness-test method, and the joints between the ECV and the regulator are checked with LDF while the gas is flowing, because that section can't be isolated and tested the same way. If you meet a regulator on the installation, check whether the medium-pressure procedure applies before you start.
- Two tests: let-by proves the ECV holds; tightness proves the pipework holds.
- Standard: IGEM/UP/1B — Edition 4 mandatory from 1 Oct 2026.
- Pass mark is now volume-based: permissible drop comes from the Installation Volume (IV), not the meter size.
- Perceptible movement defined: 0.25 mbar (water gauge) / 0.2 mbar (1-decimal electronic).
- Pipework-only retest: isolate appliances; the pipework must show no perceptible movement.
- Purge volume: PV = 1.5 × IV. Purge to move safely through the flammable range.
- A leak is a safety issue: trace with LDF, never a flame; don't leave a failing installation in use.
10-Question Mock Test
Click an option to see whether you got it right. Explanations appear instantly — no submitting at the end.
A tightness test proves the pipework is sound — that gas goes to the appliances and nowhere else. Combustion (A), gas rate (C) and flue draw (D) are separate checks.
A let-by test checks the ECV isn't passing gas into the test section. Any rise means it's letting by, which would mask a real leak — so the only pass is no rise.
IGEM/UP/1B is the tightness-testing and purging procedure. BS 6891 is pipework installation, BS 5440-1 is flueing, and IGEM/G/11 is unsafe situations.
Edition 4 moved away from meter-based drops (A) to a volume-based method. The permissible drop is read from a table against the calculated Installation Volume.
Edition 4 puts a number on the old "by eye" judgement: 0.25 mbar on a fluid (water) gauge, and 0.25 mbar on an electronic gauge — except those reading to one decimal place, where it tightens to 0.2 mbar.
The new pipework-only retest separates harmless settling inside appliance valves from a genuine pipework leak. With appliances isolated, any perceptible movement is a fail.
Gas warms and cools slightly as it's brought to pressure. Stabilising first means you're measuring a leak, not a temperature change.
Edition 4 standardised the purge volume to 1.5 × the Installation Volume, regardless of meter size or pipe diameter.
Filling air-filled pipe with gas passes through the explosive range (roughly 5–15% gas in air for NG). Purging moves through that band deliberately and vents to a safe place, leaving no ignitable mixture.
That section can't be isolated and tested like the low-pressure pipework, so the joints are proved with LDF while gas is flowing. A naked flame is never used to find a leak.
Reading it is one thing. Recalling it under exam pressure is another.
PlumbMate drills the figures that catch people out — tightness drops, purge volumes, the Edition 4 changes — with quizzes, flashcards and spaced repetition mapped to the gas ACS tickets.
🔥 Open the gas course →Full ACS revision — CCN1, CPA1, CKR1, HTR1 & CENWAT · £29.99 for 60 days, or every course for a year at £59.99
Prefer to browse first? Back to the Gas Blog →