Installing a heating system is only part of the job. The installation isn't complete — and you can't hand it over to the customer — until you've commissioned it properly, tested it for soundness, flushed it through, balanced it, and checked it performs as designed. Once the system is in service, you'll also spend a good proportion of your working life diagnosing faults on systems that someone else (or you) installed years ago.
This post covers both ends — commissioning a new system, and finding faults on an existing one. It's the final deep-dive in the Level 2 heating sub-cluster. For the others, see the system types, boilers, controls, system layouts, and open-vented vs sealed posts.
The five stages of commissioning
The workbook sets out commissioning as five sequential stages:
- Visual Inspection
- Soundness Testing
- Flushing and Disinfecting
- Performance Testing
- Final Checks and Handing Over
Each stage has to be completed before you move on to the next. Skipping ahead — for example, trying to pressure test without checking for open ends first — is how jobs go wrong. Learn the order: visual → sound → flush → perform → hand over.
Stage 1: Visual Inspection
Before you fill anything with water, walk round the installation and check it by eye.
What you're looking for:
- Pipework adequately supported — clips at appropriate centres, no unsupported runs
- No damage to pipework or appliances
- Most importantly, no open ends — any unsealed pipe will make an expensive mess the moment you fill the system
- Valves in the right positions, joints properly made
Once the visual inspection is complete, fill the system with water and check again for obvious leaks before starting soundness testing.
Stage 2: Soundness Testing — rigid pipe
Soundness testing is a pressure test that confirms the pipework can hold more than its normal working pressure without leaking. There are two different procedures — one for rigid pipe (copper, LCS, stainless steel), one for plastic.
Rigid pipe soundness test procedure:
- Visually check the pipework — are there any open ends? If yes, cap them off before proceeding.
- Fill the system with wholesome water and leave for 30 minutes so the temperature can stabilise. Check for leaks.
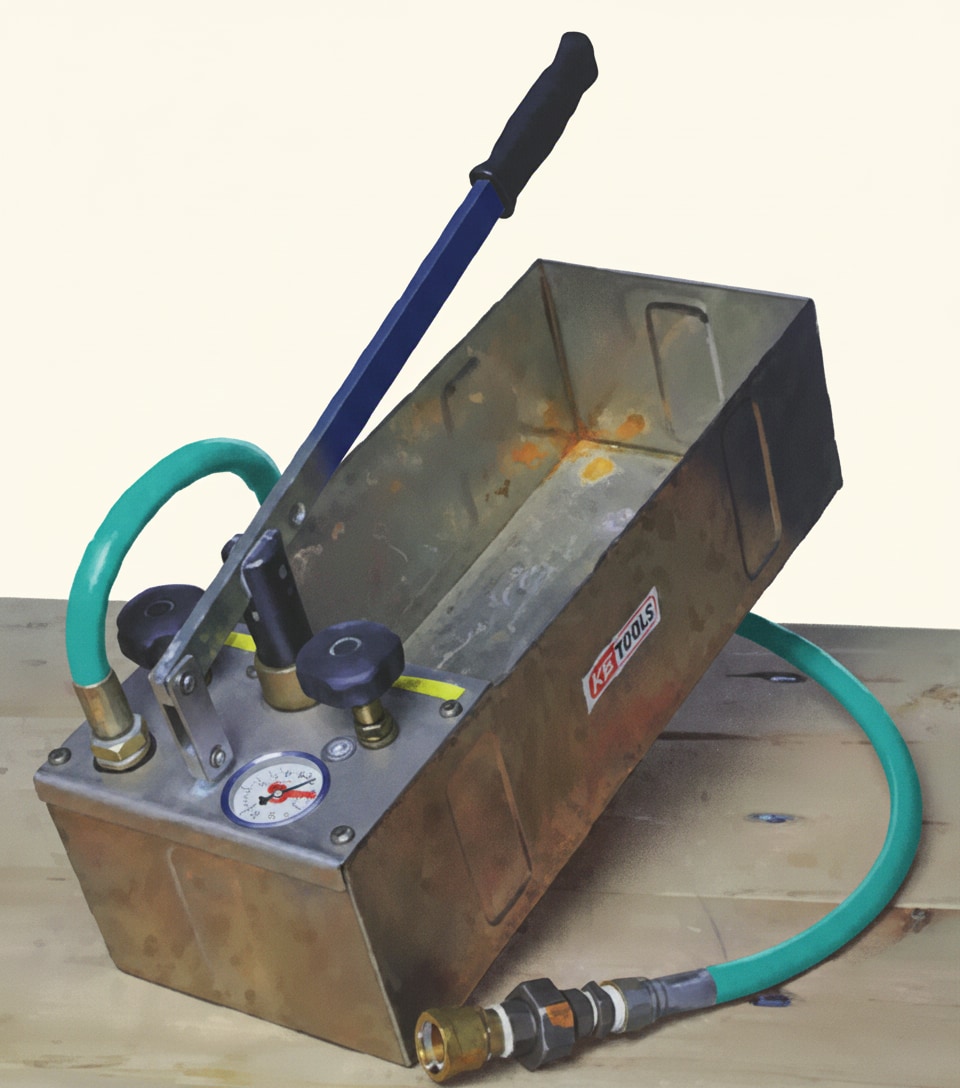
- Using a hydraulic pump, pressurise the system to 1.5× the maximum working pressure. Check for leaks again.
- Leave the pipework on test at 1.5× working pressure for 1 hour.
- Check whether there has been any pressure drop. If yes, find and fix the leak, restart the test from the fill-with-water stage.
- If no pressure drop, complete the paperwork and move on to flushing.
Worked examples:
- Working pressure 3 bar → soundness test at 4.5 bar
- Working pressure 5 bar → soundness test at 7.5 bar
If you find a leak at any stage, stop the test, fix the leak, and restart — don't try to patch and continue.
Stage 2 (continued): Soundness Testing — plastic pipe
Plastic pipe (polybutylene, MDPE) is more elastic than rigid pipe, so plastic tests allow for some pressure drop as the pipe stretches under test. There are two procedures — Test A and Test B.
Test A (timed rigid-then-drop test):
- Visual check for open ends.
- Fill with wholesome water to 1 bar, leave for 45 minutes, check for leaks.
- Pressurise to 1.5× working pressure using a hydraulic pump, check for leaks.
- Leave at 1.5× working pressure for 15 minutes.
- Drop to 1/3 of working pressure and leave for 45 minutes.
- Check for pressure drop — if yes, fix leaks and restart.
- If pass, move on to flushing.
Test B (extended pressure observation):
- Visual check for open ends.
- Fill with wholesome water, visual check for leaks.
- Pressurise to 1.5× working pressure, check for leaks.
- Top up to maintain 1.5× working pressure for 30 minutes (allowing for pipe expansion).
- Note the pressure and check again 30 minutes later — if the drop is more than 0.6 bar, the test fails.
- If acceptable, note the pressure and leave for 120 minutes — drop of more than 0.2 bar is a fail.
- If pass, move on to flushing.
For both plastic tests, the principle is the same: plastic allows some elastic give, so you're testing both initial soundness and stability over time.
Stage 3: Flushing and Disinfecting
Flushing removes debris, flux residues, and manufacturing lubricants from the pipework before the system goes into service.
Domestic flushing:
- Flush with wholesome water
- No chemical disinfection required under normal circumstances
Commercial or industrial flushing:
- May require chlorine-based products
- All relevant COSHH procedures must be followed
- If the disinfected water will be flushed into the sewage system, the water undertaker must be informed beforehand
Corrosion inhibitor:
- Heating systems should have corrosion inhibitor added after flushing
- The inhibitor protects ferrous components (radiators, steel pipework) from oxygen corrosion within the system
- Adding before flushing is pointless — it would just be flushed away
Stage 4: Performance Testing
Performance testing checks that the system actually works as designed under real operating conditions.
What to check:
- All thermostats, valves and pumps operate correctly
- Temperature measurements on flow and return — gives an indication of whether the system is balanced and the boiler is working to spec
- Pressure and flow under maximum demand (on the cold water side, that means all taps open)
Tools for performance testing:
- Pressure gauge — measures pressure at an outlet under test
- Weir cup — measures flow rate at an outlet
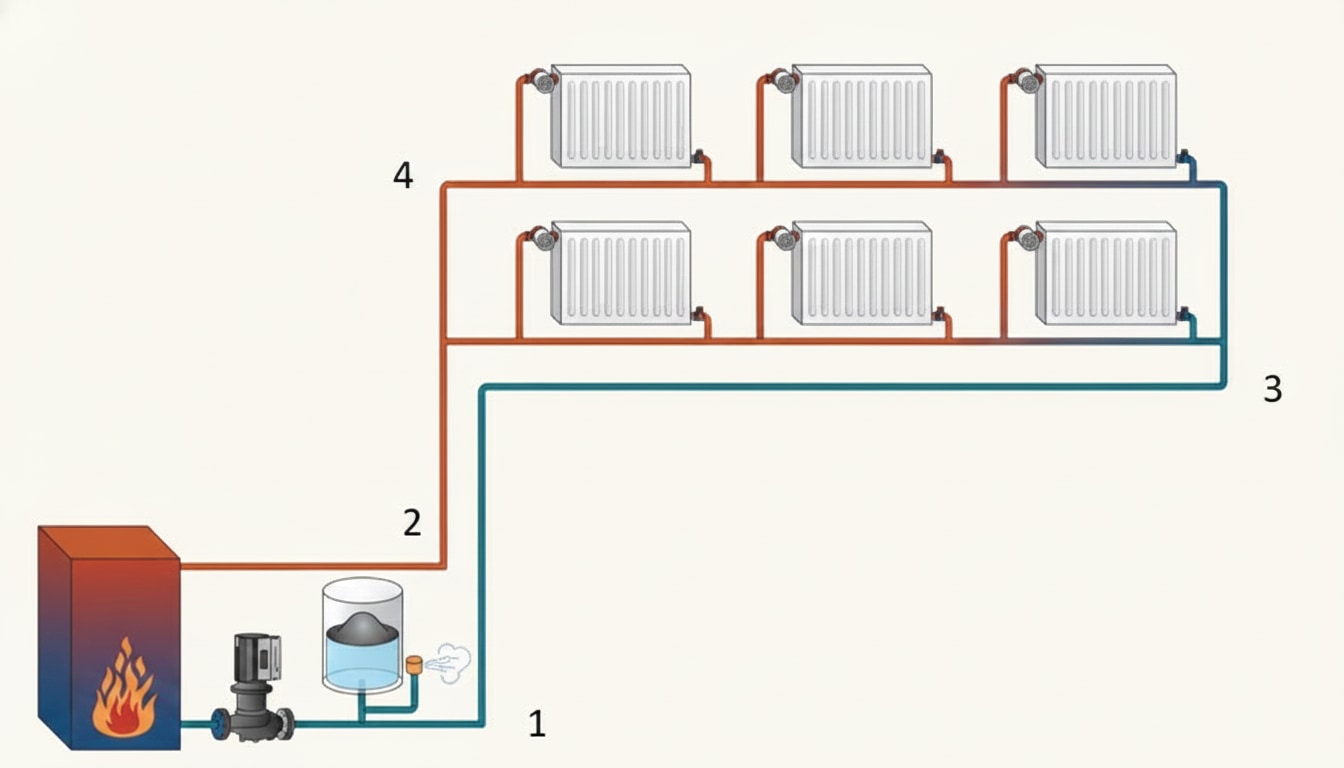
Performance testing also includes balancing the radiators. On a two-pipe system, that means adjusting the lockshield valves so each radiator heats up at roughly the same rate — with the furthest radiators' lockshields fully open and the closest ones gradually closed down.
Stage 5: Final Checks and Handing Over
The last stage is about leaving the customer with a working system and the paperwork they need to maintain it.
What to hand over:
- All relevant documents — installation certificates, building regulations sign-off, manufacturer information
- Warranties for the boiler and any other appliances
- An explanation of how the system works — where the isolators are, how to use the programmer, when to add pressure on a sealed system, etc.
Worthwhile additions (from the workbook):
- A letter thanking them for their custom — good-practice customer service that builds word-of-mouth reputation
- Highlight the need for annual servicing on certain appliances (water softeners, filters, boilers)
- Leave an emergency contact number, perhaps stuck to the appliance itself, so they call you when service is needed
Common faults and how to diagnose them
A good chunk of your working life will be spent on fault-finding. The workbook covers a set of common faults with characteristic symptoms — learn these and you'll diagnose most basic issues by ear before you even take anything apart.
Pump humming. Damaged pump, most likely needs replacing.
Knocking from pipework when the system fires up. Unclipped or loosely clipped pipework — remedy by clipping properly at appropriate centres. Don't clip too tightly (see next fault).
Ticking sound as the system heats up. Pipework clipped too tightly to wood. Thermal expansion causes the pipe to lengthen and slip past the clip under friction. Fix: slip a small piece of felt between the pipe and the wood to reduce friction.
Bubbling, gurgling, or splashing sounds. Air in the system. Bleed the radiators and install automatic air release valves at high points to prevent recurrence.
Radiators lukewarm upstairs, cold downstairs. Classic sign of pump failure. The boiler is firing and the hot water is drifting up through the system by convection alone — which reaches the upstairs radiators weakly but never forces water down to the downstairs radiators.
System constantly on / boiler firing when nothing's called for. Most likely cause is a faulty programmer, but also check for a motorised valve stuck open — the live connection in the motor causes the boiler and pump to stay on continuously. A valve stuck closed gives the opposite symptom: no heat anywhere.
Radiator warm at the bottom but cold at the top. The radiator needs bleeding — air has collected at the top and is blocking hot water from reaching the upper section.
Radiator warm at the top but cold at the bottom. The radiator needs flushing — sludge has built up at the bottom, blocking hot water flow. Sludge is typically corrosion debris from ferrous components and is minimised by keeping the inhibitor level topped up.
Decommissioning: temporary and permanent
Related to commissioning but the opposite direction. Two types:
Temporary decommissioning — taking the system out of service for maintenance or repair, knowing it'll be put back into use.
Key points:
- Before turning off a service, identify who might be affected and inform them
- If temporarily decommissioning in cold weather, or for elderly or infirm customers, provide an alternative heat source until work is complete
- If temporary decommissioning the only WC in a property, it must be reinstated the same day
Permanent decommissioning — taking a system out permanently.
Key points:
- Cap the pipe as far back as possible to prevent stagnation (still water in an unused pipe can harbour bacteria)
- Remove unused components properly and dispose of them safely
Replacing a radiator like-for-like:
- No need to drain the whole system — isolate at the radiator valves only
- TRVs should be turned to 0. If the TRV doesn't have a 0 setting, remove the head and fit a replacement cap — otherwise the valve could open when the temperature drops and empty your isolated radiator
Common exam traps
Trap 1: Order of commissioning stages. Visual → Soundness → Flushing → Performance → Handover. Questions test whether you know the order.
Trap 2: Soundness test pressure. 1.5× working pressure for both rigid and plastic pipe. Not 2×, not the working pressure, not ½×. Any other figure is a distractor.
Trap 3: Inhibitor timing. Corrosion inhibitor is added after flushing, not before. Before would just be flushed away.
Trap 4: Radiator cold at top vs cold at bottom. Cold at top = bleed (air). Cold at bottom = flush (sludge). Get these the wrong way round and you'll attack the wrong problem.
Trap 5: Flushing fluid. Domestic = wholesome water. Commercial = chlorine-based (COSHH applies, inform water undertaker). Don't assume chemical disinfection is needed on every job — it's a commercial-only step.
Quick revision summary
Before the mock test, seven things you need to be able to produce from memory:
- Five commissioning stages in order: Visual → Soundness → Flushing → Performance → Handover
- Rigid pipe soundness test: fill with wholesome water, 30 min stabilise, pressurise to 1.5× working pressure, 1 hour test, check for drop
- Flushing: domestic = wholesome water; commercial = chlorine (COSHH); heating systems get inhibitor after flushing
- Performance testing tools: pressure gauge and Weir cup
- Radiator cold at top = bleed; cold at bottom = flush
- Lukewarm upstairs, cold downstairs = pump failure
- Permanent decommissioning: cap pipe as far back as possible to prevent stagnation
📝 10-Question Mock Test
Click an option to see whether you got it right. Explanations appear instantly — no submitting at the end.
Fitting the components is installation, not commissioning. Commissioning is what you do after installation — checking, testing, and handing over a finished system. The other options are all genuine commissioning stages.
Visual inspection is the first stage of commissioning, before any pressurisation. You need to check for open ends and proper support before filling with water. Option A (capping off pipework) might be a consequence of the visual inspection, but it's not the stage itself. Option B (flushing) comes later; option D describes a separate check.
Standard soundness test pressure for both rigid and plastic pipe. Testing at working pressure (A) wouldn't catch weaknesses; testing at 2× (C) is over the top; 10× (D) would destroy the pipework.
One hour on test at 1.5× working pressure is the rigid pipe soundness test period. Shorter periods don't give enough time for slow leaks to show up. This figure comes up reliably in exam questions.
Inhibitor is added after flushing to protect the system from corrosion going forward. Adding before flushing would just wash the inhibitor out. Option D is close but wrong — the inhibitor goes in during the filling stage after flushing, before the system goes into normal use.
Domestic flushing uses wholesome water only. Chlorine-based disinfection (A) is for commercial/industrial systems. Options C and D aren't standard domestic flushing practice.
The Weir cup measures flow rate — how many litres per minute come out of an outlet. Pressure gauge (A) measures pressure, not flow. Voltage indicator (B) is an electrical test tool. Temperature probe (D) measures temperature only.
Air at the top of the radiator blocks hot water from reaching the upper section. Bleeding — opening the bleed valve at the top until water comes out — releases the trapped air. Flushing (A) is the fix for the opposite symptom (cold at the bottom, which is sludge).
The symptom is classic pump failure — hot water is still being produced but can only rise by convection, so it drifts up into the upstairs radiators and the hot water cylinder without being forced around the whole system. Downstairs radiators stay cold because convection won't push water downwards. Options A, B and C would cause different symptoms.
Capping as far back as possible eliminates the dead leg where stagnation could occur. Leaving the pipe open (A) creates an open contamination route. Option C still leaves a dead leg. Option D is over-specified.
How PlumbMate puts this into practice
Fault-finding and commissioning content is a classic mix of sequences (the five stages, the soundness test procedure) and fact pairs (cold-at-top vs cold-at-bottom) that spaced repetition handles particularly well.
- Flashcards, not essays. One prompt, one answer — the format that research has consistently shown works best for active recall.
- Wrong answers are logged. Every question you get wrong goes into a dedicated collection that resurfaces more frequently in future sessions.
- The 3× rule. You need to get a question right three times before it clears — one lucky guess isn't enough.
- Explanations on every question. Like the ones above, but on every single question in the app.