Heating is the biggest unit in the Level 2 syllabus — and probably the one you'll draw on most often when you leave the classroom. Every boiler, radiator, pump and pipework run you install for the rest of your career is covered by the principles in this unit. The good news: once you see heating systems as a small number of standard designs combining the same recurring components, the material becomes much more learnable than the textbook thickness first suggests.
This guide is the single-page overview: what the unit covers, which concepts matter most, where students reliably lose marks, and how to build a revision routine that makes it all stick. Each of the six main topics has its own deep-dive post with a full 10-question mock test and explanations — this page links out to all of them.
Why heating feels harder than it is
There are three reasons students over-estimate how hard this unit is.
First, there are a lot of moving parts. Pumps, motorised valves, thermostats, programmers, expansion vessels, F&E cisterns, radiators, TRVs, lockshields, bypass valves, air vents, air separators — all working together, each with its own position and purpose. At first glance that looks overwhelming. But every component exists for a specific reason, and once you understand why it's there, remembering where it goes becomes obvious rather than arbitrary.
Second, the named system layouts feel like they're asking you to memorise codes. S Plan, Y Plan, W Plan, C Plan — it sounds like an alphabet soup. In reality, each layout is just a different way of combining the same components for a different size or type of property. Once you can identify a layout by counting its motorised valves, the naming is a consequence of the layout rather than a thing to memorise separately.
Third, heating brings together content from other units. Thermal expansion (from the science unit) explains why you need a feed and expansion cistern or an expansion vessel. Pressure (also from science) explains why pump position matters and why a sealed system runs at higher pressure. Safe isolation (from the electrical unit) is exactly what you need before working on any heating control. Heating doesn't add these concepts from scratch — it applies them. If the science and electrical content is solid, a lot of the heating material is already half-learned.
The six areas you need to master
Level 2 heating breaks down into six main blocks. Each one has its own deep-dive post; the summaries below give you enough to decide where your gaps are.

1. System types
The foundational post. Wet vs dry, full vs background vs selective heating, and the different pipework configurations: one-pipe, two-pipe, microbore, and underfloor.
The core facts:
- Wet systems use water; dry systems use electrical elements
- One-pipe systems — single loop, water moves through radiators by convection, end radiators need to be oversized to balance. Not installed new under current Building Regulations, but you'll meet them in older properties.
- Two-pipe systems — separate flow and return, pumped circulation, lockshield valves on one side of each radiator for balancing (fully open on the furthest radiators, progressively closed on the nearest)
- Microbore — 22mm to a central manifold, 10mm or 8mm from the manifold to each radiator
- Underfloor — operates at 35°C up to max 60°C depending on floor type; pairs particularly well with condensing boilers and heat pumps because both are most efficient at low flow temperatures
For the full treatment plus a 10-question mock test, see the system types deep-dive.
2. Boilers
Three boiler types, each with different built-in components and different system requirements.
The core facts:
- Conventional (regular) boiler — open-vented; needs external cold water storage cistern, F&E cistern, cylinder, and pump
- System boiler — sealed; pump and expansion vessel built in; still needs an external cylinder
- Combi boiler — sealed; pump, expansion vessel, and hot water heat exchanger all built in; no cylinder or cisterns; instantaneous hot water
- New gas or oil boilers must be of the condensing type under Part L. Older traditional non-condensing boilers are still in service in many existing properties; when replaced, the replacement will have to be condensing.
- Five fuel types: natural gas, LPG (propane/butane/MAPP), oil (kerosene), electricity, biomass. Electricity is 100% efficient at the point of use; biomass is renewable. The first three are fossil fuels.
- Room-sealed boilers operate independently of the room air; most modern installations are room-sealed with fan-assisted flues
For the deep-dive and mock test, see the boilers post.
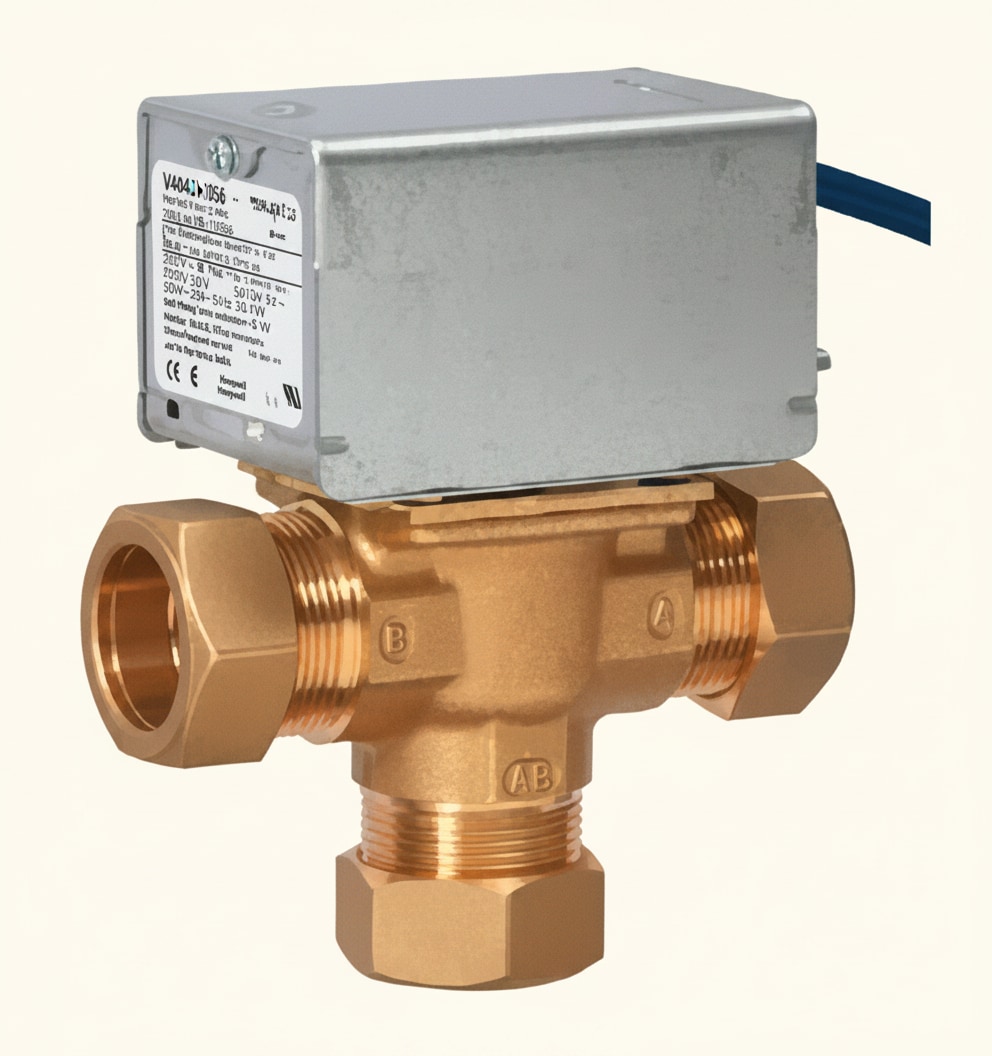
3. Heating controls
The components that turn a boiler into a controllable system. Pumps, motorised valves, programmers, thermostats, TRVs, bypass valves.

The numbers to know:
- Centrifugal pump with an impellor; needs isolating service valves on each side for maintenance
- Mid-position valve ports: AB = flow from boiler, A = heating, B = hot water
- Programmer controls when the system runs; thermostats control temperature
- Room thermostat: 1.5m from floor
- Cylinder thermostat: one-third up from the bottom of the cylinder
- Frost thermostat: 5°C
- Pipe thermostat: 25°C, sited on boiler return
- TRV rule: not in the room with the main room thermostat — because the TRV would close the radiator while the thermostat still calls for heat
- Automatic bypass valve: activated by system pressure (not temperature); keeps flow through the boiler heat exchanger when other valves close
For the deep-dive plus mock test, see the heating controls post.
4. System layouts
The named combinations of components — the ones examiners test by showing you a schematic and asking what system it is.
The core facts:
- S Plan — two × 2-port motorised valves; used for heating circuits greater than 150 m²
- S Plan Plus — more than two 2-port valves; used for multi-zone properties or where extra zones are needed (e.g. underfloor plus radiators)
- Y Plan — one 3-port mid-position valve; used for heating circuits less than 150 m². Mid-position can supply heating, hot water, or both simultaneously.
- W Plan — 3-port diverter valve (historic; diverts flow to one circuit at a time with hot water priority)
- C Plan (semi-gravity) — pumped heating, gravity hot water; 28mm minimum primary pipework between boiler and cylinder
- Part L requires almost all new installations to be fully pumped
Identifying a layout from a diagram boils down to counting and classifying motorised valves. For the deep-dive plus mock test, see the system layouts post.
5. Open-vented vs sealed systems
Every heating system is one or the other. The distinction drives pipework, pump position, safety components, and how the system fills and expands.
The numbers to know:
- Open-vented: open vent pipe 22mm minimum, 450mm rise above F&E cistern water level; cold feed 15mm minimum; F&E cistern 18 litres minimum or 4% of system volume; plastic F&E cistern sits on a firm, level board 150mm larger than the base. No valves on either the open vent or the cold feed.
- Sealed: filled via a filling loop with a double check valve (disconnected after filling); expansion vessel fitted on the coolest part of the circuit (return pipe near boiler); T&P relief valve on the boiler with a continuous-fall discharge pipe to a safe position outside
- Neutral points: open-vented = where cold feed meets the primary circuit; sealed = at the expansion vessel
- Pump position: just downstream of the neutral point so the system runs under positive pressure
For the deep-dive plus mock test, see the open-vented vs sealed post.
6. Commissioning, testing, and fault-finding
The installation isn't finished until the system is commissioned. And once it's in service, you'll spend plenty of time finding faults on existing systems.
The core facts:
- Five commissioning stages in order: Visual Inspection → Soundness Testing → Flushing and Disinfecting → Performance Testing → Final Checks and Handover
- Rigid pipe soundness test: fill with wholesome water, 30-minute temperature stabilisation, pressurise to 1.5× the maximum working pressure, hold for 1 hour, check for pressure drop
- Flushing: domestic = wholesome water; commercial = chlorine-based (COSHH applies)
- Corrosion inhibitor is added after flushing, before the final fill
- Performance testing tools: pressure gauge and Weir cup (for flow rates)
- Fault library: radiator cold at the top = bleed (air); cold at the bottom = flush (sludge); lukewarm upstairs, cold downstairs = pump failure (convection only); ticking as system heats = pipe clipped too tightly, use felt; knocking = unclipped pipework; system constantly on = faulty programmer or motorised valve stuck open
For the deep-dive plus mock test, see the commissioning post.
Four exam-technique habits that apply across the whole unit
Draw system diagrams from memory. For every system type or named layout, close the book and draw it. Mark the flow, return, pump position, cold feed, vent or expansion vessel, and every motorised valve. You'll find out immediately where your understanding is shaky. This beats re-reading by a long way.
Know what every component is for. Every item in the syllabus exists for a specific reason. An expansion vessel exists because water expands when heated. A lockshield exists because two-pipe systems favour the closest radiators without it. A temporary continuity bond exists because cutting into a metal pipe could create a dangerous spark. When you understand the why, the what and where follow naturally.
Memorise the specific numbers, don't try to reason them out. Pipe sizes (15mm, 22mm, 28mm), heights (1.5m, 450mm), percentages (4%, 1.5×), capacities (18L), test durations (1 hour, 30 minutes), temperatures (5°C, 25°C, 60°C). These are facts, not reasoning questions. Spaced repetition handles them fastest.
Count motorised valves first when identifying a layout. Two 2-port = S Plan. Three or more 2-port = S Plan Plus. One 3-port with port AB marked = Y Plan (mid-position). One 3-port without port AB = W Plan (diverter). No motorised valve on the hot water side = C Plan (semi-gravity). A consistent checklist beats trying to recognise layouts as whole patterns.
Building a revision routine that actually works
The research on revision is overwhelming and consistent: spaced repetition beats cramming, active recall beats re-reading, and little-and-often beats long weekend sessions. Every credible study on student learning over the last fifty years points to the same conclusions.
In practical terms:
- Use flashcards, not re-reading. Passive reading feels productive and is nearly useless for exam recall. Active recall — forcing your brain to produce the answer before checking it — is what builds long-term memory.
- Little and often. Three ten-minute sessions across the day beat one thirty-minute block, and both beat a three-hour cram the night before.
- Revisit at increasing intervals. If you get a fact right today, don't retest it tomorrow — test it in three days. If you get it right again, test it in a week. This is the spacing that beats the forgetting curve.
- Focus on what you don't know. There's no point drilling yourself on the stuff you already know cold. Spend your time on the material you keep getting wrong.
For the full treatment of this method, see the spaced repetition guide — which also covers how PlumbMate operationalises it.
A recommended revision order
Heating is larger than other Level 2 units, so give yourself more time than you might expect. If you've got six weeks to the exam and you're starting from scratch, here's a sensible sequence:
Week 1: System types. Foundation — wet vs dry, one-pipe vs two-pipe, microbore, underfloor. You can't properly understand any specific layout until you know the basic pipework configurations.
Week 2: Boilers. What sits at the heart of every system — conventional, system, combi; condensing; fuel types; room-sealed vs open-flued.
Week 3: Heating controls. The components that make the system controllable. Fact-heavy — thermostat positions, valve port letters, pump requirements. Spaced repetition is particularly effective here.
Week 4: System layouts. Pulls together everything from weeks 1–3 into the named S Plan, Y Plan, W Plan, and C Plan combinations. This is where diagram identification questions live.
Week 5: Open-vented vs sealed. The pressure/expansion dimension that overlays every layout. Pipe sizes, heights, cistern capacities, neutral points. The most fact-dense topic in the unit.
Week 6: Commissioning and fault-finding. The real-world application — testing, flushing, balancing, diagnosing. This also ties in material from other units (safe isolation for electrical components, soundness testing from processes).
Mock tests and weakness-targeting. Do the 10-question mock tests in all six deep-dives. Anything you get wrong, mark and re-drill. The last week isn't for learning new material — it's for turning wobbly knowledge into exam-ready knowledge.
If you've got less than six weeks, compress the schedule but keep the order. If you've got more, spend the extra time on mock questions rather than re-reading notes.
Don't overthink it
Heating looks intimidating from the outside because there's so much of it. But the material breaks down into a small number of clear topics, each built on principles that make sense once you understand them. Every component has a purpose. Every named layout is a way of combining the same parts. Every number in the syllabus exists because something specific fails if you ignore it.
The students who pass first time aren't the ones who've memorised a huge list of disconnected facts. They're the ones who understood the logic of how heating systems work, drilled the specific numbers consistently, and used active recall instead of re-reading.
How PlumbMate puts this into practice
PlumbMate covers the full Level 2 heating syllabus with spaced repetition built in — exactly the method described in the revision section above.
- Flashcards, not essays. One prompt, one answer — the format that research has consistently shown works best for active recall.
- Wrong answers are logged. Every question you get wrong goes into a dedicated collection that resurfaces more frequently in future sessions.
- The 3× rule. You need to get a question right three times before it clears — one lucky guess isn't enough.
- Explanations on every question. So you learn the logic rather than memorising answers.