Safe isolation is the most important test a plumber will ever learn. Every time you work on anything electrical — a central heating pump, an immersion heater, a boiler, a shower — you need to know, with certainty, that the circuit is dead before you touch it. The workbook is emphatic about this, and for good reason. A plumber who doesn't know safe isolation properly is one cover-plate away from a serious injury.
This post walks through the full 6-step workbook procedure — not a simplified version — because when your life depends on something, simplifying it isn't helpful.
This is the third post in the Level 2 electrical principles sub-cluster. For the others, see the Ohm's Law and Power Law, earthing and bonding, and circuits and cables posts.
Why it matters
Every year, people are injured or killed by electrical shocks at work. The overwhelming majority of these incidents happen because someone assumed a circuit was dead without testing it properly — because a circuit breaker "looked off", because someone said it had been isolated, because the job was quick and nobody wanted to be bothered.
The safe isolation procedure exists because assumption kills people. Testing doesn't.
Get this procedure right, in order, every time — and you'll never have to find out the hard way why it has six steps and not three.
The equipment you need
Three pieces of kit:
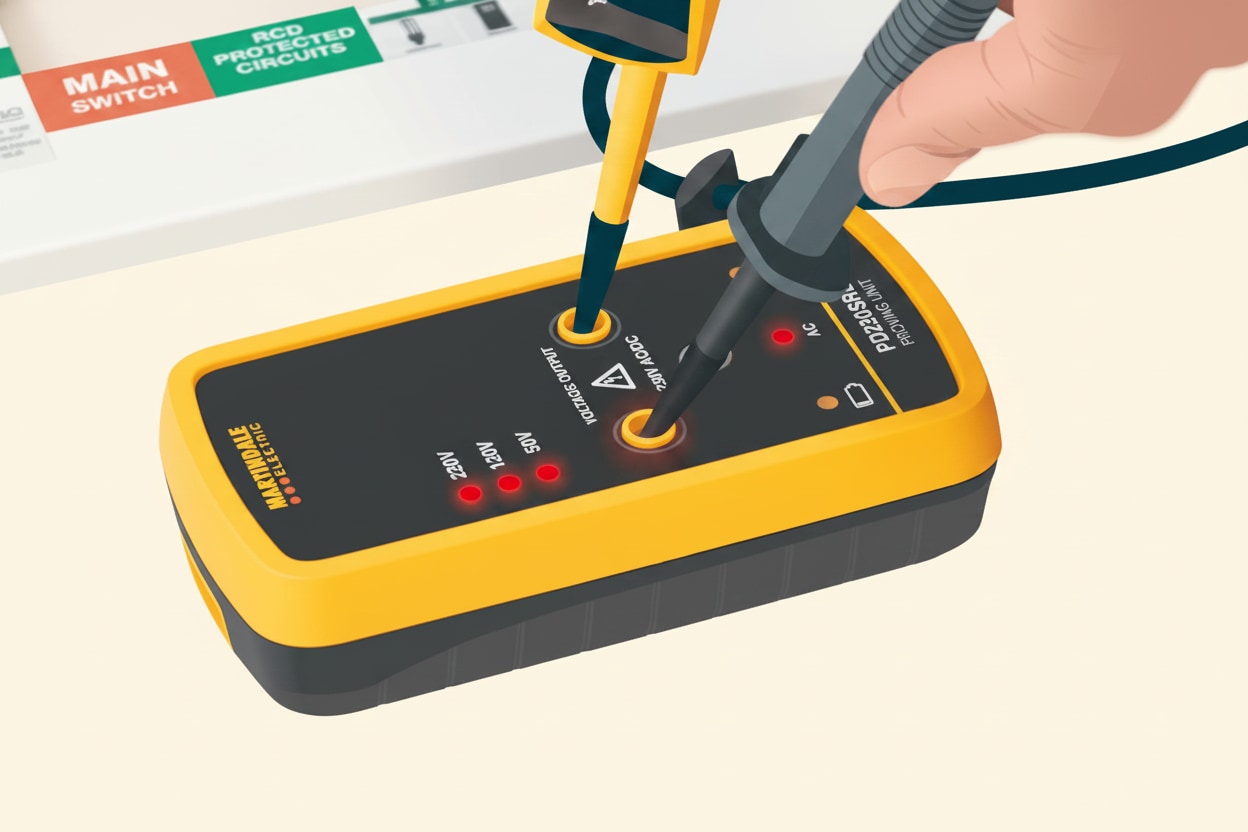

Approved voltage indicator. A device specifically designed for testing that a circuit is dead. It must conform to GS38 (the HSE guidance note on electrical test equipment). A neon screwdriver is NOT an approved voltage indicator — never use one for safe isolation. The approved version has two probes, clear indicator lights at standard voltages, and insulated probes that only expose a small length of conductor.
Proving unit. A small device that produces a known voltage — typically 240 V — for the sole purpose of proving that your voltage indicator is working. You test your indicator on the proving unit before and after the isolation test. If the indicator shows the expected voltage both times, you know it was working throughout.
Lock-off device. A physical lock that clips onto a circuit breaker (or main switch) to prevent it being switched back on while you're working. It comes with a unique key — which you keep with you at all times.
The full 6-step procedure
This is the procedure straight from the workbook. Learn it in order.
1. Check the voltage indicator on a known supply.
Before you do anything else, confirm your voltage indicator is working. Use a proving unit or a known live circuit. If the indicator doesn't register the expected voltage, stop — your indicator is faulty and the whole procedure is invalid.
2. Locate the correct isolation device and isolate the circuit.
Which device depends on the job. If you're working on one circuit, you can turn off the relevant MCB at the consumer unit. If you're working in the consumer unit itself (such as replacing an MCB), you must turn off the main switch and isolate the whole property.
3. Lock off the circuit.
Fit a locking device with a unique key to the isolator. If the circuit uses a fuse rather than an MCB (older installations), remove the fuse entirely and keep it in your pocket — not on a shelf, not in a toolbox, in your pocket.
4. Post a notice.
Attach a warning notice stating that you are working on the circuit. Include your mobile number so you can be contacted if anyone needs to restore power for any reason. This prevents a well-meaning colleague or customer from switching the power back on while you're elbow-deep in the job.
5. Check all parts of the circuit are dead.
Use the approved voltage indicator to test the circuit at the point you're going to work on. Test between three combinations: line to neutral, line to earth, and neutral to earth. If any of those shows a voltage, the circuit isn't fully isolated and you can't work on it.
6. Recheck the voltage indicator on the known supply.
Go back to your proving unit and test the indicator again. If it still shows the expected voltage, you know the indicator was working for the whole test — which means your "dead" reading in step 5 was genuinely dead. If the indicator has failed, the "dead" reading you got in step 5 is meaningless and you need to start over.
Only after step 6 is it safe to work on the circuit.
Why six steps, not three
You may have seen shorter versions of this procedure in other material — "prove, test, prove" is common shorthand. That shortened version misses four critical elements: locating the correct isolation device, locking off, posting a notice, and the three-point voltage testing. All four are in the workbook for good reason.
- Wrong isolation point = you isolate the wrong circuit and work on something live.
- No lock-off = a colleague flips the breaker back on while you're working.
- No notice = a customer assumes the power cut is a fault and resets the breaker.
- Not testing all three combinations = a neutral fault can leave a circuit "line-to-neutral dead" but still dangerous line-to-earth.
Every step in the 6-step procedure exists because someone has been hurt or killed by its absence.
Why three test combinations?
When you test for dead in step 5, you test between:
- Line and neutral — proves the load side isn't energised
- Line and earth — proves there's no fault between live and earth (which could leave a "line-to-neutral dead" circuit still able to shock you)
- Neutral and earth — proves there's no fault on the neutral side
All three need to read zero volts. If any one of them shows a reading, the circuit isn't fully isolated. Single-point testing (just line-to-neutral, for example) can miss fault conditions that will hurt or kill you.
GS38 and approved voltage indicators
GS38 is the HSE's guidance note on electrical test equipment for use by electricians. It sets out requirements for safe voltage indicators, including:
- Insulated probes with only a small exposed conductive tip (about 4 mm maximum)
- Integral fused leads where appropriate
- Clear indication of voltages at standard levels
- No reliance on a battery (which could die mid-test and give a false "dead" reading)
A neon screwdriver does not meet GS38 and should never be used for safe isolation. It's a quick go/no-go indicator at best, and it can give false readings in either direction. The workbook is explicit: safe isolation requires an approved voltage indicator.
When you need to isolate, and where
The isolation point depends on the job:

- Working on one circuit (immersion heater, central heating pump, boiler, light fitting) — isolate the relevant MCB at the consumer unit.
- Working in the consumer unit itself (replacing an MCB, adding a new circuit) — isolate the whole property at the main switch.
- Working on the incoming supply or main switch — this is beyond the scope of a plumber's work. Call an electrician.
Never work on a circuit you can't isolate. If you can't find the right breaker, can't lock it off, or can't get clear access to the consumer unit — stop and call an electrician. No plumbing job is worth a shock.
Common exam traps
Trap 1: Wrong order. The procedure has a specific sequence, and examiners test it directly. The first and last step are both "check the voltage indicator on a known supply" — if an answer option doesn't start and end with that, it's wrong.
Trap 2: Testing only line-to-neutral. Step 5 requires testing between three combinations. Options that mention only line-to-neutral are distractors, not correct answers.
Trap 3: Neon screwdrivers. These are not approved voltage indicators and do not meet GS38. Any question offering a neon screwdriver as an option is testing whether you know the difference.
Trap 4: What to do with the fuse. If you remove a fuse as part of isolation, you keep it in your pocket. Not nearby, not on a shelf, not with the customer. In your pocket — because it can't be used to restore power if it's on your person.
Quick revision summary
Before the mock test, five things you need to be able to produce from memory:
- Six steps: check indicator (proving unit), isolate, lock off, post notice, test dead (line-neutral, line-earth, neutral-earth), recheck indicator (proving unit)
- Always use an approved voltage indicator (GS38) — never a neon screwdriver
- Test between all three combinations: line-to-neutral, line-to-earth, neutral-to-earth
- If removing a fuse as part of isolation, keep it in your pocket
- Always use a locking device with a unique key — the key stays with you
📝 10-Question Mock Test
Click an option to see whether you got it right. Explanations appear instantly — no submitting at the end.
Safe isolation must be carried out with an approved voltage indicator conforming to GS38. A neon screwdriver (A) is not an approved voltage indicator and can give false readings. A multi-meter (B) is for measurement in general and a continuity tester (D) tests whether a circuit is complete — neither is the right tool for proving a circuit dead.
The indicator is tested on the proving unit as step 1 (before isolation) and step 6 (after testing for dead). Testing before confirms the indicator is working; testing after confirms it didn't fail during the dead test. If an indicator can fail mid-test, the "dead" reading it gave is meaningless — which is why the final check is non-negotiable.
Three combinations, not one or two. Missing any of the three can leave a fault condition undetected. Option C is a classic distractor because it includes two of the three — but it's still incomplete.
The workbook is explicit: the fuse goes in the pocket of the person doing the work. Leaving it near the consumer unit (B) means a well-meaning colleague could put it back in. Giving it to the customer (C) means they might reset the circuit without understanding the implications. In your pocket, it can't be used.
The key stays with you. A warning notice (A) alone doesn't physically prevent someone switching power back on. Removing the breaker (C) is excessive and not the standard procedure. Electrical tape (D) doesn't stop anyone peeling it off and flipping the switch.
This is the only option that includes all six steps in the correct order: prove indicator → isolate → lock off → notice → test dead → prove indicator again. The other options all skip critical steps — lock-off, the notice, or the final indicator check.
GS38 is the Health and Safety Executive's guidance note on electrical test equipment for use by electricians. It sets the requirements that an "approved voltage indicator" must meet. If your voltage indicator doesn't conform to GS38, it's not approved for safe isolation.
Neon screwdrivers have fully exposed conductive tips, no fused leads, and can give false "live" or "dead" readings depending on circumstances. They're not designed for safe isolation and they don't meet GS38. Treat any suggestion that a neon screwdriver is acceptable as wrong.
Because the immersion heater is on its own dedicated circuit, you can isolate just that circuit at the consumer unit — there's no need to isolate the whole house. Option A would work but is unnecessary. Option B (the fuse in the fused switched spur) isolates only downstream of the spur, leaving the wiring between the consumer unit and the spur still live — not full isolation. Option D is never a plumber's isolation point.
Temporary continuity bonds fit across a pipe before you cut it, maintaining electrical continuity so there's no potential difference between the two sides of the cut and therefore no spark. Supplementary (A) and main (B) bonds are permanent fittings, not temporary cut-protection. A fused switched spur (D) is an electrical isolation device, not a pipework one.
How PlumbMate puts this into practice
Safe isolation is exactly the kind of topic spaced repetition is built for — a specific procedure with a specific sequence that has to be at your fingertips.
- Flashcards, not essays. One prompt, one answer — the format that research has consistently shown works best for active recall.
- Wrong answers are logged. Every question you get wrong goes into a dedicated collection that resurfaces more frequently in future sessions.
- The 3× rule. You need to get a question right three times before it clears — one lucky guess isn't enough.
- Explanations on every question. Like the ones above, but on every single question in the app.