Plumbing science is the unit most Level 2 students worry about and the unit most are revising badly for. This guide is the single-page overview: what the syllabus actually covers, which concepts matter most, where students reliably lose marks, and how to build a revision routine that makes the material stick.
Each of the four main topics has its own deep-dive post with a full 10-question mock test and explanations — this page links out to all of them. Work through the overview first to see where your gaps are, then hit the deep-dives on the areas you're weakest on.
Why plumbing science feels harder than it is
Practical plumbing makes sense. You can see a pipe, you can feel a radiator warming up, you can hear water moving through a system. Plumbing science is abstract: invisible pressures, formulas with Greek letters, materials behaviours you've never had to think about before. That abstractness is what intimidates students — not the difficulty of the content itself.
The good news: once you translate the science back into things you can see on a job, most of it clicks. A pressure question is just "how much water is stacked above the tap?" A thermal expansion question is just "how much does the pipe grow?" A heat transfer question is just "why does the top of the cylinder get hot first?" Learn the formulas, then anchor each one to something physical. That's the method.
The four areas you need to master
Level 2 plumbing science breaks down into four main blocks. Each matters for different reasons, and each has its own classic exam traps.
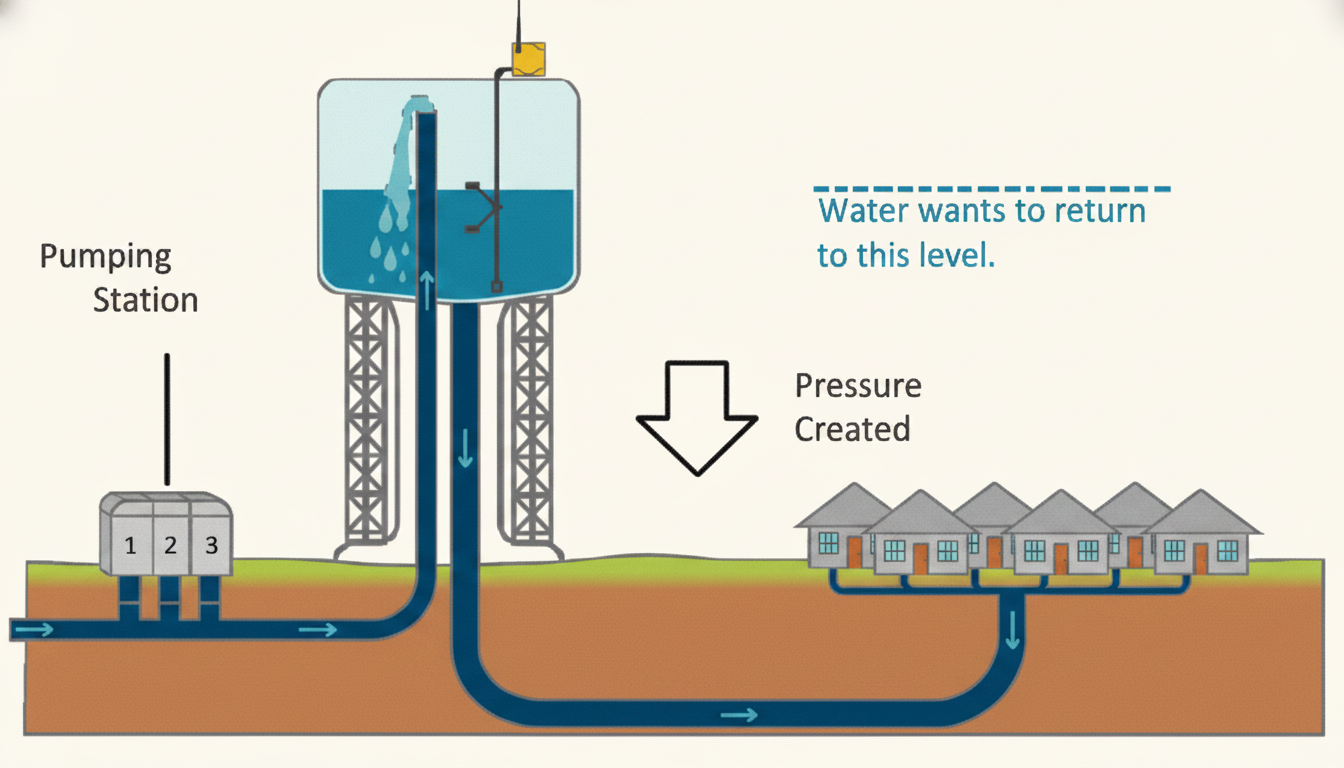
1. Pressure and force
Head pressure, pressure units (Pa, kPa, MPa, bar), the pressure formula P = ρgh, and the force formula F = P × A. This is probably the biggest single source of lost marks in the whole unit — not because the maths is hard, but because examiners load every question with unit-conversion traps.
The core ideas to nail:
- Pressure = force per unit area
- 1 bar = 100,000 Pa = 100 kPa = 0.1 MPa
- Approximately 0.1 bar per metre of head
- P = ρ × g × h (with ρ = 1,000 kg/m³ for water, g = 9.81 m/s²)
- F = P × A
If you can produce those five facts from memory and apply them to a calculation, pressure questions become reliable marks. For the full treatment plus a 10-question mock test, see the pressure and force deep-dive.
2. Thermal expansion
Everything grows when heated. For plumbers, that means pipework that gets noisier and joints that leak if expansion isn't allowed for. The core formula is ΔL = α × L × ΔT, using material-specific coefficients that you need to know at least approximately.
The key facts:
- Linear expansion formula: ΔL = α × L × ΔT
- Copper coefficient = 0.000016 m/°C; mild steel and cast iron = 0.000011 m/°C; plastic = 0.00018 m/°C
- Plastic expands roughly 11× more than copper — the single most important comparative fact in this block
- Water expands 4% when heated from 4°C to just below boiling, 10% when it freezes, and 1600× when it turns to steam
- Real-world compensation: expansion loops, sleeves, sliding clips, expansion vessels
Thermal expansion questions are mostly calculation-based with a few "why does this happen on site?" scenario questions thrown in. For the deep-dive plus 10-question mock test, see the thermal expansion post.
3. Heat transfer
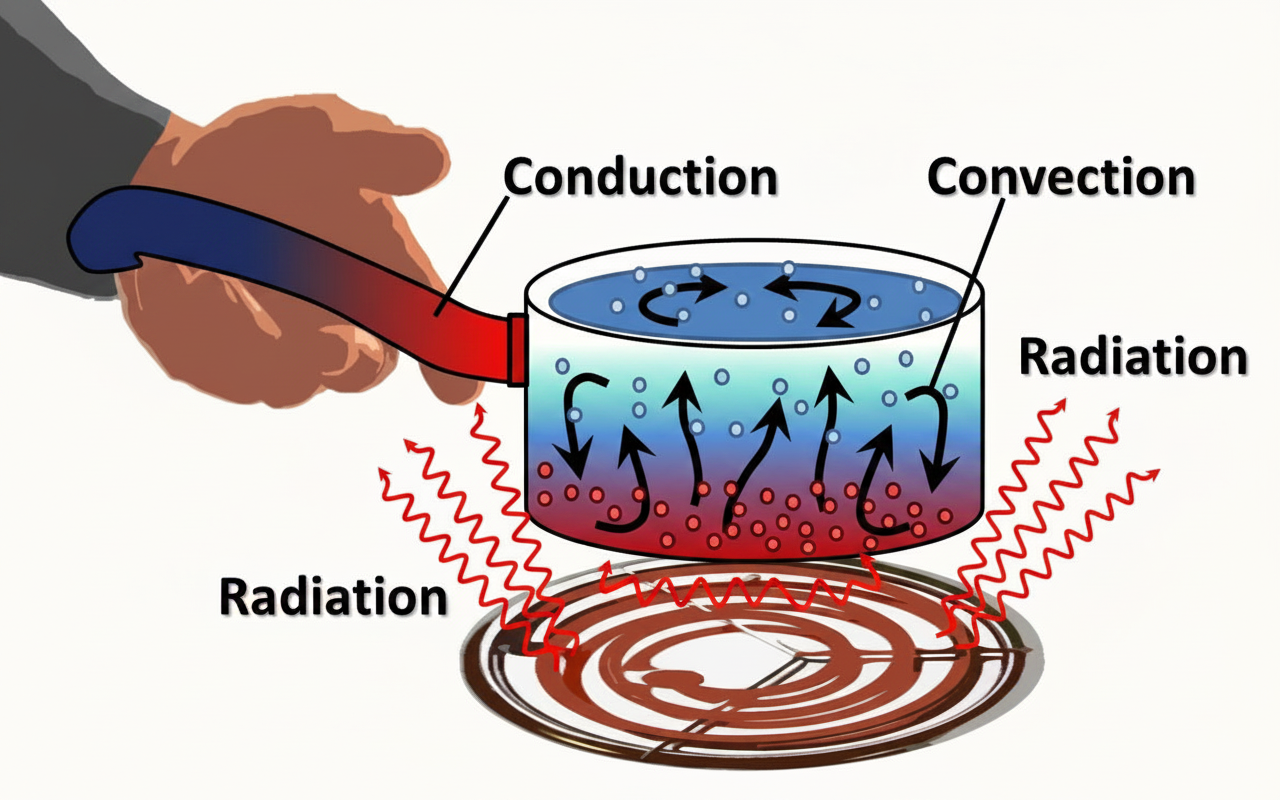
Heat transfer is where plumbing science meets every heating system you'll ever work on. The three modes — conduction (through solids), convection (through moving fluids), and radiation (through space) — are conceptually simple but examiners love testing whether you understand the mechanism rather than just the name.
The non-negotiables:
- Conduction through solids (copper pipe wall, cylinder wall, heat exchanger)
- Convection through fluids (hot water rising in a cylinder, primary circuits, room air movement)
- Radiation through space/vacuum (the reason vacuum flasks work)
- Heat always moves from hot to cold — there is no "cold transfer"
- A "radiator" is mostly a convector — about 15% radiation, 85% convection
Heat transfer questions are conceptual rather than calculation-heavy, which makes them easy marks once you genuinely understand the three modes rather than having memorised the words. For the deep-dive and mock test, see the heat transfer post.
4. Materials, density, and heat capacity
The last block covers why we use the materials we use, the density of water, and the energy needed to heat water (and other fluids).
The core facts:
- Water density: 1,000 kg/m³ at 4°C (its maximum density point)
- 1 litre of water = 1 kg — the conversion that unlocks almost every calculation
- Water expansion: 4% heated, 10% frozen, 1600× as steam
- Specific heat capacity of water ≈ 4.186 kJ/kg·°C
- Q = m × c × ΔT — the heat energy formula
- Copper has very high thermal conductivity; plastic and insulation have very low
- Ferrous = contains iron, magnetic, rusts (cast iron, low carbon steel, malleable iron; stainless steel is NOT ferrous)
- Corrosion types: electrolytic (two metals + electrolyte), pitting (workmanship/hard water), erosion (high water velocity), blue water (stagnation in new copper)
This block also brings together material selection — why copper for heat exchangers, why plastic for cold water, why stainless steel for aggressive conditions. For the deep-dive plus mock test, see the materials, density, and heat capacity post.
The three exam-technique habits that separate passes from fails
Before you dive into the revision itself, four habits worth building now. These apply across all four plumbing science blocks, and they're the difference between students who know the material and students who can show they know it in a 40-question multiple-choice exam.
Check the units before you check the numbers. In a pressure question, if you've calculated in bar but the answers are in pascals, your arithmetic is right but your mark is gone. Circle the required unit in the question stem before you start working.
Sense-check your order of magnitude. If the question is about a 5-metre head of water and your answer is 50 bar, something has gone wrong — a 5-metre head can't produce 50 bar because we already know it's around 0.5 bar. Whenever you finish a calculation, ask yourself: does this number make sense? This catches more mistakes than any other single habit.
Don't guess which formula to use — read the question twice. Pressure-vs-force questions are a classic trap. The formulas are related but not interchangeable, and choosing the wrong one means the right arithmetic produces the wrong answer. Read the question stem twice, decide which formula applies, and then start calculating.
Building a revision routine that actually works
The research on revision is overwhelming and consistent: spaced repetition beats cramming, active recall beats re-reading, and little-and-often beats long weekend sessions. Every credible study on student learning over the last fifty years points to the same conclusions.
In practical terms:
- Use flashcards, not re-reading. Passive reading feels productive and is nearly useless for exam recall. Active recall — forcing your brain to produce the answer before checking it — is what builds long-term memory.
- Little and often. Three ten-minute sessions across the day beat one thirty-minute block, and both beat a three-hour cram the night before.
- Revisit at increasing intervals. If you get a fact right today, don't retest it tomorrow — test it in three days. If you get it right again, test it in a week. This is the spacing that beats the forgetting curve.
- Focus on what you don't know. There's no point drilling yourself on the stuff you already know cold. Spend your time on the material you keep getting wrong.
For the full treatment of this method, see the spaced repetition guide — which also covers how PlumbMate operationalises it.
A recommended revision order
If you've got four weeks to the exam and you're starting from scratch, here's a sensible sequence:
Week 1: Pressure and force. Biggest single source of lost marks and the most formula-heavy block. Get this one solid first.
Week 2: Thermal expansion and heat transfer. These two share the same conceptual DNA (energy moving around). Tackle them together so the connections reinforce each other.
Week 3: Materials, density, and heat capacity. A lot of facts to memorise — density of water, SHC of water, corrosion types, thermal conductivity rankings. Spaced repetition is particularly effective here.
Week 4: Mock tests and weakness-targeting. Do the 10-question mock tests in all four deep-dives. Anything you get wrong, mark and re-drill. The last week isn't for learning new material — it's for turning wobbly knowledge into exam-ready knowledge.
If you've got less than four weeks, compress the schedule but keep the order. If you've got more, spend the extra time on mock questions rather than re-reading notes.
Don't overthink it
Plumbing science feels harder than it is because it looks like "real science." It's not — it's a defined set of formulas, a defined set of facts, and a defined set of questions that examiners build from those facts year after year. Learn the formulas, drill the numbers, sense-check your answers, and the marks are there.
The students who pass first time aren't the ones with a natural gift for physics. They're the ones who started revising early, built a consistent daily habit, and used active recall methods instead of just reading the workbook.
How PlumbMate puts this into practice
PlumbMate covers the full Level 2 plumbing science syllabus with spaced repetition built in — exactly the method described in the revision section above.
- Flashcards, not essays. One prompt, one answer — the format that research has consistently shown works best for active recall.
- Wrong answers are logged. Every question you get wrong goes into a dedicated collection that resurfaces more frequently in future sessions.
- The 3× rule. You need to get a question right three times before it clears — one lucky guess isn't enough.
- Explanations on every question. So you learn the logic rather than memorising answers.