Hot water is the unit where Level 2 students start to feel they're learning real plumbing. It combines cold water content (cisterns, pipework, fluid categories) with heating content (boilers, primary circuits, expansion) and adds its own specific ideas (cylinders, open vented vs unvented, stratification, TMVs). It's also the unit where the consequences of getting things wrong become most real — scalding at outlets, Legionella in stored water, pressure build-up in sealed systems. The syllabus is rich, the content is important, and the examiners know it.
This guide covers the whole unit at single-page summary depth, with links out to the six deep-dive posts that handle each topic in full.
Why hot water feels harder than it is
Three reasons students underestimate this unit — and one key insight that makes the whole subject much easier.
First, hot water straddles two other units. You can't fully understand a hot water system without knowing cold water content (CWSC, float valves, fluid categories) AND heating content (primary circuits, boilers, expansion). Students who haven't got the first two units locked in find hot water harder than it needs to be, because they're learning prerequisites at the same time as the main subject.
Second, the vocabulary layers up fast. Primary cold feed. Secondary cold feed. Primary open vent. Secondary open vent. Primary flow. Secondary return. Once you've learned what "primary" and "secondary" mean and which applies where, the vocabulary is straightforward — but until you've done that, it's a word-salad that can feel impossible to untangle.
Third, there are a lot of possible systems. Direct or indirect × open vented or sealed × storage or instantaneous × centralised or localised = 16 possible combinations. Students try to learn each one as a separate system to memorise. You don't need to — most combinations don't exist in practice, and the ones that do follow patterns.
The key insight that unlocks the whole unit: every hot water system is a combination of four choices, and once you know the four choices, you can identify any system and predict its pipework from first principles.
The four choices:
- Storage or instantaneous — does the system store heated water or heat on demand?
- Centralised or localised — does one heater serve the whole property or each outlet individually?
- Open vented or sealed (unvented) — fed from a cistern at gravity pressure, or fed from mains at high pressure?
- Direct or indirect — heat source touches the water you'll use, or separated by a coil/heat exchanger?
Every system in the Level 2 syllabus is one specific combination of these four axes. Learn the axes, and you've learned the system.
The six areas you need to master
Level 2 hot water breaks into six main blocks. Each one has its own deep-dive post; the summaries below give you enough to locate your gaps.
1. Hot water system classifications
The framework everything else hangs on. Four classification axes; specific rules about which combinations exist.
Core facts:
- Four axes: storage/instantaneous, centralised/localised, open vented/sealed, direct/indirect
- Instantaneous systems can ONLY be sealed AND direct — no exceptions
- Storage systems can combine with any of the other axes
- Indirect = presence of a heating coil (or annulus) between heat source and stored water
- Legionella risk comes from storage — instantaneous systems have minimal risk
- Four-question diagnostic for any system diagram: Is there a cylinder? A cistern? A coil? How many outlets?
For the full deep-dive plus mock test, see the classifications post.
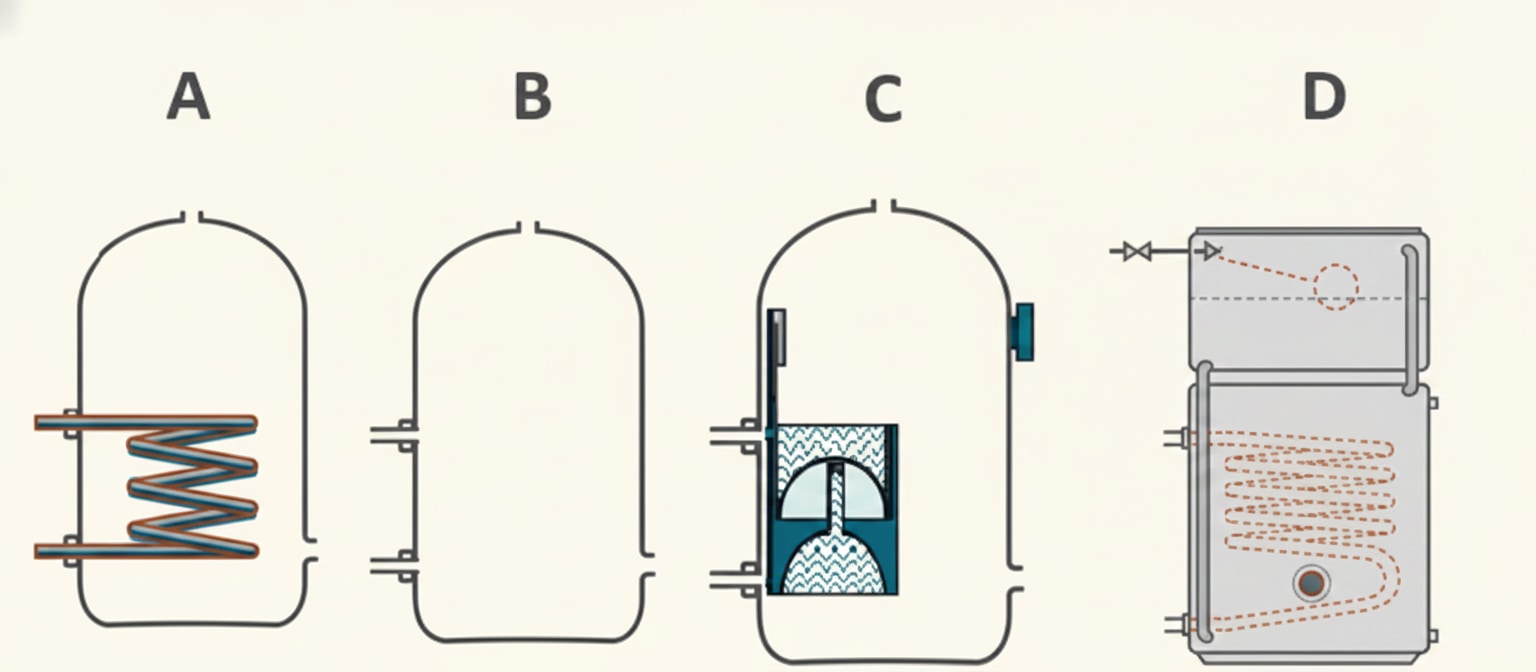
2. Hot water cylinder types
Six cylinder types, each with a distinctive diagram appearance.
Core facts:
- Direct cylinder — no coil; heat added directly to stored water (immersion or direct boiler)
- Double Feed Indirect with coil — coil visible; separate CWSC and F&E cistern
- Double Feed Indirect with annulus — annulus instead of coil; otherwise same
- Single Feed Indirect — no F&E cistern; primary and secondary both fed from CWSC; separated by air bubble in heat exchanger
- Combination cylinder — CWSC built into top of cylinder; must not be below highest outlet; notorious for low pressure
- Unvented cylinder — no cistern; fed from mains; expansion vessel + T&P relief + discharge pipe; typically stainless steel; G3 qualification to install
- Multi-coil cylinders (twin/triple/quad) for combining multiple heat sources
- 1m pipe insulation before and after cylinder (Part L)
For the deep-dive plus mock test, see the cylinder types post.
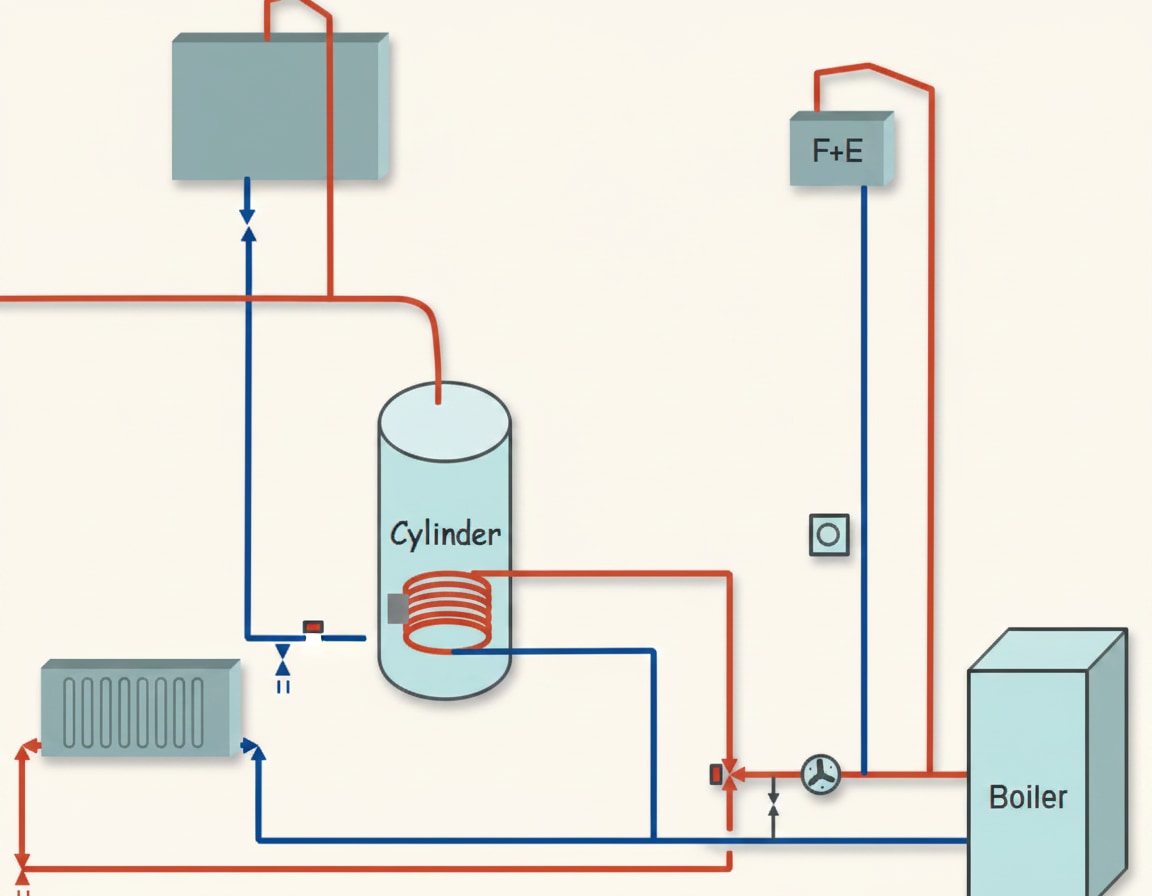
3. Open vented hot water systems
The traditional UK setup with specific pipework rules.
Key figures to commit to memory:
- Cistern sizes: 110L cylinder only; 220L if feeding hot and cold outlets
- Secondary cold feed: minimum 22mm from CWSC base to cylinder base; service valve between CWSC and cylinder
- Secondary open vent: from top of cylinder; minimum 22mm (19mm internal diameter); 450mm horizontal run before rising (prevents parasitic circulation)
- Vent rise formula: 0.04 × height in metres + 0.15 (rise above cistern water level)
- Primary open vent (indirect systems): 22mm minimum, no valves, off primary flow close to boiler
- Primary cold feed: 15mm minimum, no valves, from F&E cistern
- Cylinder grades: Grade 1 = 25m, Grade 2 = 15m, Grade 3 = 10m (most common domestic)
- Stratification: hot at top, cold at bottom; supports cylinder efficiency
- Parasitic circulation prevented by the 450mm horizontal run
- Cold feed above cold distribution — scald prevention
For the deep-dive plus mock test, see the open vented systems post.
4. Unvented hot water systems
The modern mains-fed alternative.
Core facts:
- Mains-fed, sealed — no cistern; typically stainless steel construction
- Three-tier safety: cylinder thermostat → overheat (high-limit) thermostat → temperature and pressure relief valve (T&P relief)
- Expansion vessel fitted on the cool part of the system (cold supply to cylinder)
- Discharge pipe: falls continuously, discharges safely outside, caged if below head height
- Tundish between D1 and D2 — provides air break, visible indication of discharge, prevents siphonage/backflow
- Balanced cold water supply required so mixer valves work properly
- G3 qualification required to install, service, or commission
- Annual service legally required
- Advantages over open vented: high pressure at all outlets, smaller bore pipework feasible, no loft cistern required
- Disadvantages: G3 qualification requirement, more safety components, no backup if mains fails
For the deep-dive plus mock test, see the unvented systems post.
5. Heat sources for hot water
What actually heats the water.
Core facts:
- Fossil fuels: natural gas, LPG, oil (all emit CO₂ when burnt)
- Electricity via immersion heater (direct heating in cylinder)
- Renewable sources: solar thermal, biomass (solid fuel), geothermal, air-source heat pumps
- Immersion heater electricals: 16A MCB (15A if rewireable), 13A fuse in fused switched spur, 2.5mm T&E to spur, 1.5mm heat-proof flex from spur to immersion (cylinder cupboard is warm)
- Immersion safety cut-out: around 85–90°C
- Solar thermal: requires twin-coil cylinder plus backup heat source
- Biomass (solid fuel): requires heat leak radiator; can use gravity circulation; 28mm minimum primary pipework for gravity (vs 22mm for pumped)
- Multi-coil cylinders for combining heat sources
- Legionella: 60°C minimum stored water (legal requirement); 65°C maximum (limescale threshold in temporary hard water)
- Localised heaters: single-point (one outlet), multipoint (a few outlets); both use heat exchangers
For the deep-dive plus mock test, see the heat sources post.
6. Temperature control, secondary circulation and commissioning
The "making it safe, making it available, making sure it works" post.
Core facts:
- Scalding prevention: 43°C maximum at bathing outlets (TMV3 standard)
- TMV balanced supply required — hot and cold from same pressure source
- Mains-fed TMV: single check valves on both hot AND cold (one on each)
- TMV close to outlet — as short as possible to minimise dead leg
- Dead legs as short as possible — Legionella risk; fix with secondary circulation or trace heating
- Secondary circulation pump: bronze or stainless steel (non-corrosive); enters cylinder in top 1/3 through a purpose-made connection
- Five commissioning stages: Visual → Soundness → Flushing → Performance → Handover
- Rigid pipe soundness test: 1.5× working pressure, 1 hour
- Plastic pipe Tests A and B same as cold water (covered in the cold water commissioning post)
- Unvented cylinders need annual G3 service
For the deep-dive plus mock test, see the temperature control and commissioning post.
Four exam-technique habits that apply across the whole unit
Classify any system against the four axes before answering diagram questions. When you see a diagram, don't try to match it to a remembered type. Instead, ask the four questions: Is there a cylinder (→ storage)? Is there a cistern (→ open vented)? Is there a coil visible (→ indirect)? How many outlets (→ centralised or localised)? The four answers identify the system reliably.
Memorise the specific numbers; don't try to derive them. Cistern sizes (110L/220L), pipe sizes (secondary cold feed 22mm / primary cold feed 15mm / primary and secondary vents 22mm), vent horizontal run (450mm), vent rise formula (0.04 × height + 0.15), cylinder grades (25m/15m/10m for Grades 1/2/3), immersion heater specs (16A MCB/13A fuse/2.5mm T&E/1.5mm heat-proof flex), temperature thresholds (60°C min storage, 65°C max storage, 43°C max outlet for bathing). Flashcards clear them faster than any other method.
Pair every open vented feature with its unvented equivalent. Cistern ↔ mains supply. Vent pipe ↔ expansion vessel. Cylinder grade ↔ mains pressure rating. Specific size pipework ↔ more flexible pipework. Understanding each system in comparison with the other is the fastest way to make both stick.
Classify every fault as a temperature, pressure, or flow problem. When tackling a fault-finding question, the fault is almost always in one of three categories: temperature (thermostat, heat source, heat transfer), pressure (expansion vessel charge, mains supply, cylinder pressurisation), or flow (dead leg, airlock, blockage, pump failure). Matching the symptom to the category narrows the diagnosis fast.
Building a revision routine that actually works
The research on revision is overwhelming and consistent: spaced repetition beats cramming, active recall beats re-reading, and little-and-often beats long weekend sessions. Every credible study on student learning over the last fifty years points to the same conclusions.
In practical terms:
- Use flashcards, not re-reading. Passive reading feels productive and is nearly useless for exam recall. Active recall — forcing your brain to produce the answer before checking it — is what builds long-term memory.
- Little and often. Three ten-minute sessions across the day beat one thirty-minute block, and both beat a three-hour cram the night before.
- Revisit at increasing intervals. If you get a fact right today, don't retest it tomorrow — test it in three days. If you get it right again, test it in a week. This is the spacing that beats the forgetting curve.
- Focus on what you don't know. There's no point drilling yourself on the stuff you already know cold. Spend your time on the material you keep getting wrong.
For the full treatment of this method, see the spaced repetition guide — which also covers how PlumbMate operationalises it.
A recommended revision order
Hot water is roughly the same size as cold water and heating. If you've got five weeks to the exam and you're starting from scratch, here's a sensible sequence:
Week 1: Classifications (post 1). The foundational framework. Get the four axes locked in before moving on — every later post assumes you can identify a system type from its components.
Week 2: Cylinder types (post 2). Six types to identify on diagrams. Draw each one from memory with the internal components labelled — this is the fastest way to make the distinctions stick.
Week 3: Open vented systems (post 3) + Unvented systems (post 4). The two system types in parallel, learning the equivalent components on each. Pair learning makes both easier.
Week 4: Heat sources (post 5) + Temperature control and commissioning (post 6). What heats the water and how you keep it safe. Immersion heater electricals are the heaviest fact-load in week 4.
Week 5: Mock tests and weakness-targeting. Do the 10-question mock tests in all six deep-dives. Anything you get wrong, mark and re-drill. This is the week that turns wobbly knowledge into exam-ready knowledge.
If you've got less than five weeks, compress the schedule but keep the order. If you've got more, spend the extra time on mock questions rather than re-reading notes.
Don't overthink it
Hot water has a lot of components, a lot of specific numbers, and a lot of system combinations — but at the core it's a small number of ideas. Four classification axes. Six cylinder types. Two system types (open vented and unvented) with equivalent components on each. A handful of heat sources. Three critical temperatures (60°C storage minimum, 65°C storage maximum, 43°C outlet maximum for bathing).
The students who pass first time aren't the ones who've memorised every possible system as a distinct thing. They're the ones who understood the four-axis classification framework, drilled the specific numbers consistently, and used active recall instead of re-reading.
How PlumbMate puts this into practice
PlumbMate covers the full Level 2 hot water syllabus with spaced repetition built in — exactly the method described in the revision section above.
- Flashcards, not essays. One prompt, one answer — the format that research has consistently shown works best for active recall.
- Wrong answers are logged. Every question you get wrong goes into a dedicated collection that resurfaces more frequently in future sessions.
- The 3× rule. You need to get a question right three times before it clears — one lucky guess isn't enough.
- Explanations on every question. So you learn the logic rather than memorising answers.