Processes is the unit where theory meets practice. Every tool you use, every material you cut, every joint you make, every clip you fix — it's all Processes content. The exam tests you on tool identification, material grades, joint types, bending rules, clip distances, joist calculations, and fixings, because every one of those facts shapes what you do on a real job. Students who pass first time are the ones who respected how fact-dense this unit actually is and drilled the specific figures consistently.
This guide covers the whole unit at single-page summary depth, with links out to the six deep-dive posts that handle each topic in full.
Why Processes deserves more attention than students give it
Three reasons students underestimate Processes — and one insight that makes the volume manageable.
First, Processes feels practical, so students assume it's common sense. The unit is about tools and techniques you can see, touch, and use. So it feels less demanding than the abstract physics of Plumbing Science or the legislative framework of Health and Safety. But the exam isn't testing whether you've used a basin wrench — it's testing whether you know its name, what it's specifically for, and the alternatives. That's a different kind of knowledge, and it takes deliberate memorisation.
Second, the volume is genuinely substantial. Dozens of tools to identify by sight and name. Three grades of copper. Two grades of LCS. Six types of plastic pipe. Six types of joint. Three types of pipe bender. Three bender components. Six types of bend. Three full tables of clip distances for three different materials. Seven notching and drilling calculations. Several dozen screws, fixings and nails. When you list it out, the total knowledge footprint is larger than some of the heating or cold water content.
Third, the figures really matter. Unlike some exam topics where you can reason your way to the answer, Processes asks for specific numbers: 1.2m horizontal 15mm copper; 0.3m horizontal 15mm plastic; depth÷8 for notching; depth÷4 for drilling; πd÷4 for a 90° bend. These aren't derivable from first principles — they need to be memorised.
The key insight that unlocks the whole unit: every physical plumbing job follows the same five-step sequence, and each step has its own tools, materials, and rules.
Material → Cut → Joint → Bend (if needed) → Install
- Material. What pipe you're using (copper, LCS, plastic) determines everything downstream.
- Cut. What you cut with depends on the material (wheel cutter for copper, hacksaw for LCS or plastic).
- Joint. Joint type depends on material (soldered or pushfit or compression for copper; threaded for LCS; solvent weld or pushfit for plastic).
- Bend. If the route has direction changes, can you bend (R220 by hand, R250 with a machine) or do you need fittings (R290, rigid plastics)?
- Install. Clip it, fix it, route it through joists and walls following Part A of the Building Regulations.
Learn the sequence, and you've learned the unit as a workflow rather than a pile of disconnected facts. At each step, ask "what material?" and the correct tools, joints, bending approach, and clip distance follow.
The six areas you need to master
Level 2 Processes breaks into six main blocks. Each has its own deep-dive post; the summaries below give you enough to locate your gaps.
1. Hand tools
The foundation — identify tools by sight and name, and know use/safety/maintenance for each.
Core facts:
- Every tool has four facts to know: name, use, safety requirement, maintenance requirement
- Pre-use checks: clean, moving parts free, blades secured, correct PPE, correct tool for task
- Hammers: claw (nails), lump/club (driving chisels), sledge (walls), ball pein (metalwork)
- Chisels: wood (timber), cold (masonry), plugging (mortar), bolster (bricks)
- Saws: hacksaw (metal, teeth forward), hard point (wood), floorboard, pad (plasterboard), junior hacksaw (intricate)
- Copper cutters: wheel cutter, pipe slice (check wheel condition); hacksaw works but rougher
- Basin tap nut = adjustable tap spanner (basin wrench)
- Waste hole in brickwork = lump hammer + cold chisel
- Specialist tools: reseating tool, radiator key, Allen keys, immersion spanner, pipe freezing kit, hydraulic pressure tester
- Damaged tool = out of use immediately
For the full deep-dive plus mock test, see the hand tools post.
2. Power tools and electrical safety
Distinct risk profile from hand tools, so a separate post.
Core facts:
- Pre-use visual inspection: casing, cable (especially near plug and tool), plug, PAT certificate, blade/guard
- PAT testing every 3 months on corded tools on site; battery tools use visual inspection instead
- 110V maximum on site (yellow colour coding)
- Double insulation = two independent layers between conductors and user
- Cable management: above head height / around edges; never coiled in use
- PPE by tool: jigsaw = goggles; angle grinder = goggles + mask + ear defenders; vibrating tools = gloves
- Gloves always on hydraulic bending machines
- First-use check on battery tool = inspect for damage (not PAT, not RCD test)
- HAVS/VWF prevention: don't grip too tightly; rotate tasks; report tingling symptoms early
For the deep-dive plus mock test, see the power tools and electrical safety post.
3. Pipe materials and their properties
The materials inventory plus the properties that make each one suitable for specific jobs.
Core facts:
- Ferrous vs non-ferrous: ferrous contains iron, rusts (cast iron, LCS, malleable iron); stainless steel is NOT considered ferrous because it doesn't rust
- Copper grades: R220 (soft, microbore, bends by hand); R250 (half-hard, standard domestic); R290 (hard, cannot be bent)
- LCS grades: medium (red/brown coded); heavy (blue coded); used only for heating and gas (not water — rust contamination)
- Stainless steel: alloy; corrosion-resistant; used for unvented cylinders
- MDPE colours: blue = water, yellow = gas, black = old alkathene
- Sanitary plastics: PVCu, MuPVC, ABS (UV-susceptible), PP (cannot be solvent welded)
- Standard sizes: copper/stainless/PB all use 15/22/28mm; LCS by inches/internal bore; sanitary plastic 32/40/50/82/110mm
- Mechanical properties: ductility (allows bending); malleability (allows hammering — lead is most malleable); tensile/compressive/shear strength
- Top three heat and electrical conductors: silver, copper, gold
- Alloying: copper + zinc = brass; copper + tin = bronze; copper + tin + zinc = gunmetal
For the deep-dive plus mock test, see the pipe materials post.
4. Jointing pipework
The methods of connecting pipes together.
Core facts:
- All fittings WRAS-approved on water systems; all pipework deburred before jointing
- Soldering sequence: cut/deburr → clean → flux (brush only) → heat → solder (lead-free on water systems) → clean off flux
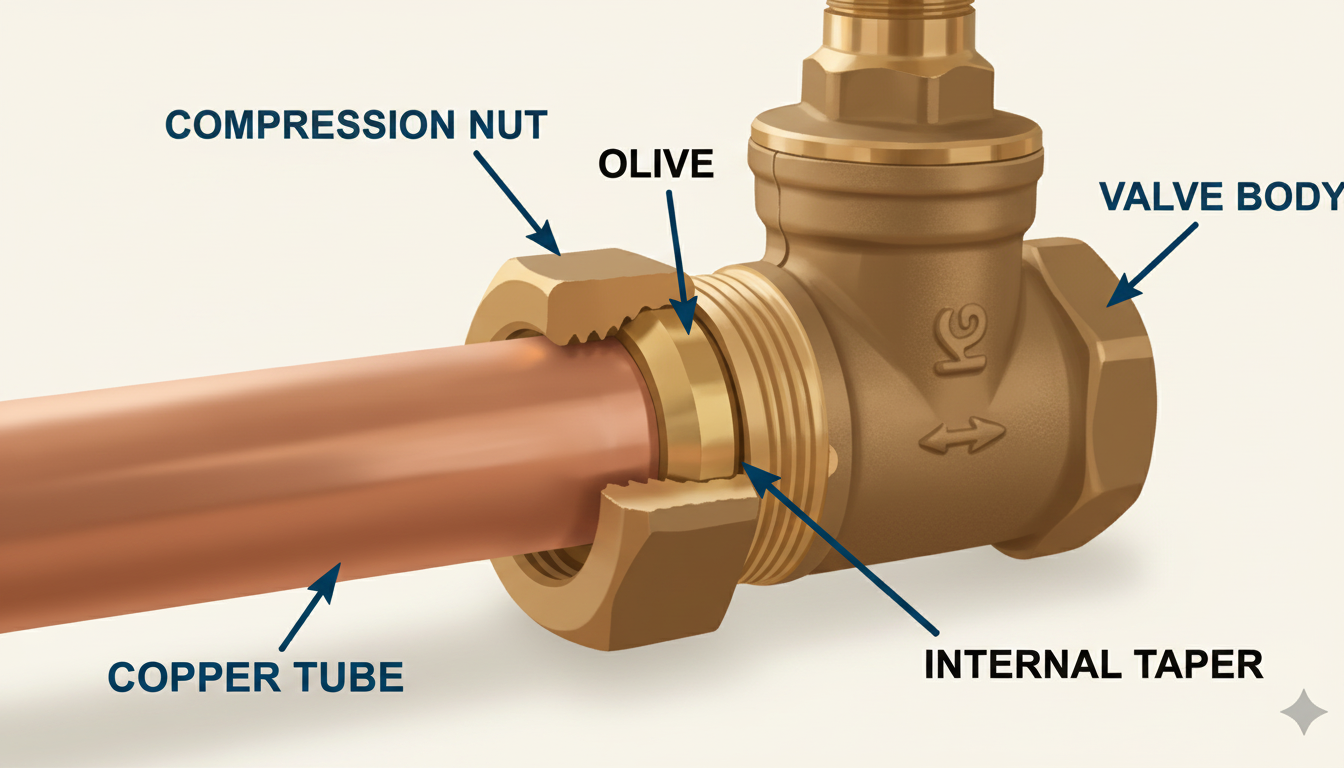
- Type A compression (non-manipulative): above ground only; copper, PB, PE
- Type B compression (manipulative): above and below ground; R220/R250 only (not R290)
- Polyethylene compression: MDPE above or below ground; always needs pipe insert
- Pipe inserts support the soft internal wall for PB, PE, and large-bore R220 copper
- Pushfit: copper and PB; re-enterable
- Press-fit: O-ring sealed; crimping machine; no heat
- LCS: threaded joints (cut with stocks and dies); PTFE tape (water); Boss White (heating); reverse threading at end to release swarf
- Sanitary jointing: compression / pushfit / solvent weld; 10mm expansion gap on pushfit; PP cannot be solvent welded
- Fitting shapes: coupling, elbow (knuckle/swept/45°/street), stop end, reducer, tee (middle leg last — 22-22-15)
- X dimension = pipe stop to fitting centre; cut length = centre-to-centre minus X dimensions
For the deep-dive plus mock test, see the jointing post.
5. Bending pipe and fabrication
Changing pipe direction without using fittings.
Core facts:
- Copper bendability: R220 by hand (pre-annealed); R250 with machine; R290 cannot be bent
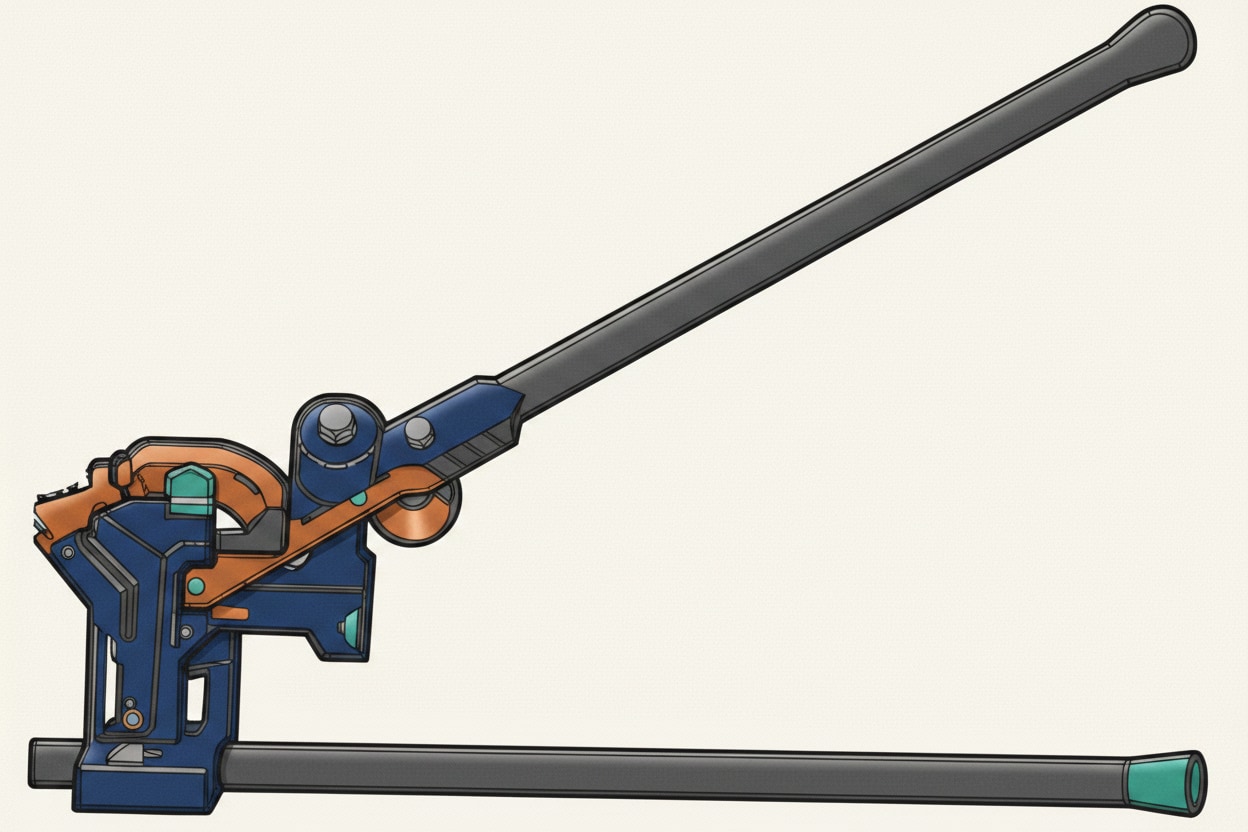
- Benders: scissor (small copper + small stainless); stand (larger — 35mm+); hydraulic (LCS)
- Bender components: former (shape), back guide (holds pipe to former), pipe stop (positions pipe)
- Hydraulic bender: regularly check oil level
- Bending springs: internal or external; up to 22mm typical; back injury risk
- Annealing: heat treatment that softens copper by changing molecular structure; persists after cooling; R220 is pre-annealed
- LCS overbend 5°: want 30° → bend to 35°; want 45° → bend to 50°
- Types of bend: 90°, offset, passover, half passover, cranked, double offset
- Bend length formula: 90° bend = πd ÷ 4 (or 2πr ÷ 4)
For the deep-dive plus mock test, see the bending post.
6. Installation: clipping, fixings and joist work
The practical installation content — Building Regs compliance, clip spacing, screws and fixings.
Core facts:
- Building Regs Part A covers structural strength (notching, drilling, chasing)
- Minimum joist depth: 100mm before any notching or drilling
- Notching: closest to wall = 0.07 × span; farthest = span ÷ 4; max depth = depth ÷ 8
- Drilling: closest to wall = span ÷ 4; farthest = 0.4 × span; max diameter = depth ÷ 4; min spacing between holes = 3 × diameter
- Chasing walls: horizontal = ⅙ wall thickness; vertical = ⅓ wall thickness
- Copper clip spacing: 15mm = 1.2m H / 1.8m V; 22/28mm = 1.8m H / 2.4m V
- Plastic clip spacing: 15mm = 0.3m H / 0.5m V; 22mm = 0.5m H / 0.8m V; 28mm = 0.8m H / 1m V
- LCS clip spacing: ½" = 1.8m H / 2.4m V; ¾"/1" = 2.4m H / 3m V
- Heating pipes not tightly fixed to joists (expansion and contraction noise)
- Stand-off clips for insulated pipework
- Screws: countersunk (general); round head (visible); self-tapping (sheet metal); mirror (bath panels); brass (WC pans)
- Plasterboard fixings: plastic plugs or hollow wall anchors (light items)
- Sheet lead fixings: stainless steel screws
For the deep-dive plus mock test, see the installation post.
Four exam-technique habits that apply across the whole unit
Memorise the specific figures — don't try to derive them. Clip spacing (copper 15mm = 1.2H/1.8V), joist calculations (notching depth÷8; drilling depth÷4), copper grades (R220/R250/R290), bend length (πd÷4), chasing limits (horizontal ⅙/vertical ⅓). None of these come from intuition — they're specific workbook facts that the exam tests directly. Flashcards clear them faster than any other method.
Learn by matching, not by isolated facts. Every material has its own tools, joints, bending approach, and clip distance. Instead of learning "R250 copper" separately from "scissor bender" separately from "1.2m clip spacing", learn them together: "R250 copper = standard domestic = cut with wheel cutter = join with solder or compression = bend with scissor or stand bender = clip at 1.2m horizontal." This is how the knowledge gets used on site, and it's how exam questions are structured.
Use the five-step sequence as a mental checklist. Material → Cut → Joint → Bend → Install. When you face an exam question, ask which step it's testing. "What clip distance?" is Install. "What's the maximum depth of notch?" is Install. "Which grade of copper bends by hand?" is Bend. Sorting questions by step stops you panicking about unfamiliar-sounding questions — most are variants of familiar content framed differently.
For tool identification, use image-based flashcards. The "which tool is shown in the following photograph" question type tests visual recognition, not written knowledge. A flashcard with a picture on one side and the name on the other builds the skill directly. Written definitions don't transfer well to picture-identification questions.
Building a revision routine that actually works
The research on revision is overwhelming and consistent: spaced repetition beats cramming, active recall beats re-reading, and little-and-often beats long weekend sessions. Every credible study on student learning over the last fifty years points to the same conclusions.
In practical terms:
- Use flashcards, not re-reading. Passive reading feels productive and is nearly useless for exam recall. Active recall — forcing your brain to produce the answer before checking it — is what builds long-term memory.
- Little and often. Three ten-minute sessions across the day beat one thirty-minute block, and both beat a three-hour cram the night before.
- Revisit at increasing intervals. If you get a fact right today, don't retest it tomorrow — test it in three days. If you get it right again, test it in a week. This is the spacing that beats the forgetting curve.
- Focus on what you don't know. There's no point drilling yourself on the stuff you already know cold. Spend your time on the material you keep getting wrong.
For the full treatment of this method, see the spaced repetition guide — which also covers how PlumbMate operationalises it.
A recommended revision order
Processes is a moderate-to-large unit. Four weeks gives you time to work through everything properly without rushing the fact-heavy sections.
Week 1: Hand Tools + Power Tools (posts 1–2). The foundational content. Tool identification is visual, so use image-based flashcards heavily. The PAT testing and 110V rules are reliably tested, so lock those in this week.
Week 2: Pipe Materials (post 3). The vocabulary the rest of the unit builds on. The copper grades, LCS grades, MDPE colours, and material properties all appear in later posts, so get them solid now. This week is heavy on pure memorisation — ideal flashcard territory.
Week 3: Jointing + Bending (posts 4–5). Two related topics with specific rules. The Type A vs Type B compression distinction, the copper grade bendability rules, and the LCS overbend are the most-tested facts here. The bend length formula (πd÷4) and X dimension calculation are worth practising with worked examples.
Week 4: Installation + Mock tests (post 6 + all mocks). The clip spacing tables and joist calculations are the most fact-dense part of the whole cluster — worth a full week of drill. End the week doing the 10-question mock tests in all six deep-dives, aiming for 8/10 minimum before considering yourself ready.
If you've got less than four weeks, compress but keep the order. If you've got more, spend the extra time on mock tests and weakness-targeting rather than re-reading notes.
Processes is the unit that pays off everywhere
Every job you do on site uses Processes knowledge. Every pipe cut, every joint made, every clip fixed, every hole drilled. Unlike some units where the exam content and the site content don't perfectly overlap, Processes knowledge transfers directly — the facts you memorise for the exam are the facts you use every day.
Students who master Processes pass the exam AND do better practical work. That's not a coincidence — it's the nature of the unit. The effort you put into learning clip distances and joist calculations doesn't just earn you marks. It makes you a faster, safer, more competent plumber.
How PlumbMate puts this into practice
PlumbMate covers the full Level 2 Plumbing Processes syllabus with spaced repetition built in — exactly the method described in the revision section above.
- Flashcards, not essays. One prompt, one answer — the format that research has consistently shown works best for active recall.
- Wrong answers are logged. Every question you get wrong goes into a dedicated collection that resurfaces more frequently in future sessions.
- The 3× rule. You need to get a question right three times before it clears — one lucky guess isn't enough.
- Explanations on every question. So you learn the logic rather than memorising answers.